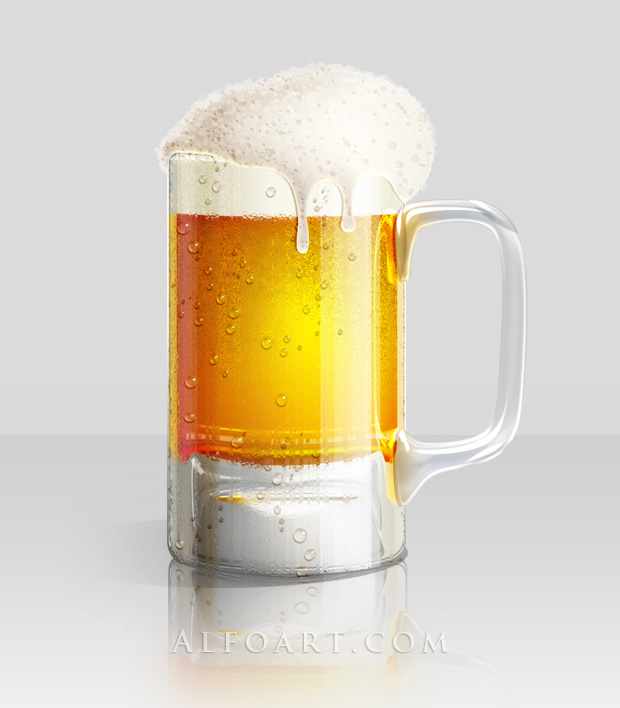
In Today's tutorial we will learn how to make a cold beer glass in Photoshop We use color effect and Photoshop technique to make this tutorial. So let's check it out....
Download free icons set:
Cold Beer Glass icons with transparent background. (Please, feel free to use them for private or commercial projects, but do not sell or distribute these icons by itself).
Download glass shapes set and pattern:
Glass shapes.
Pattern.
Create a new Photoshop document, the size around 1200*1200px, resolution 72px/inch.
Apply Gradient effect to the background layer.
.jpg)
Download glass shapes Glass shapes. In order to install shapes, just drag downloaded file from the folder to open Photoshop window. Choose Custom Shape Tool
 from tools palette, open custom shape picker and find glass shapes. The largest glass body(#1 on the screen shot below) shape should be 350*624 px. Open Geometry options and choose fixed size, insert 350px and 624px for the glass body shape.
The sizes for other details:
#2 - 326 * 472px
#3 - 196 * 455px
#4 - 286 * 116px
#5 - 216 * 16px
#6 - 285 * 111px
#7 - 405 * 272px
Create each new shape in a new layer. All adjustments and layer style effect will work correctly for the shapes with sizes above.
.jpg)
Make all layers except first one invisible temporary.
Apply following layer style effects to it. The gradient has many color steps, you may download it here: glass body gradient.
.jpg)
.jpg)
.jpg)
.jpg)
Make visible "liquid inside the glass" shape. Cut out top selected part and paste it into a new layer.(we will use this shape later to create beer foam).
Apply Gradient Overlay layer style effect to this layer.
.jpg)
.jpg)
Duplicate this shape first time and apply following adjustments:
.jpg)
.jpg)
.jpg)
.jpg)
.jpg)
Duplicate liquid layer third time. Apply Free Transformation to the duplicated shape, move left and right sides to glass shape borders.
.jpg)
Then clear central liquid area. Keep active transformed layer, load selection for the original liquid shape and remove selected area.
.jpg)
Duplicate liquid shape fourth time. Cut out large top part of the shape, just leave bottom selected area.
Set Fill = 0 and apply following adjustments:
.jpg)
.jpg)
.jpg)
.jpg)
.jpg)
Find cut off part from the original liquid layer and make it visible. Apply gradient effect to it.
.jpg)
.jpg)
Duplicate created layer with the new empty layer and make it little bit lighter.
Go to Image > Adjustments > Brightness/Contrast, set Brightness +40.
.jpg)
Apply Dissolve blending mode to light foam layer.
.jpg)
Then merge dissolved layer with a new empty layer and apply 70% Opacity and Blending Mode effect.
.jpg)
.jpg)
Duplicate dissolved layer and apply Gaussian Blur filter to the bottom one.
.jpg)
.jpg)
.jpg)
Apply Bevel and Emboss effects to created copy.
.jpg)
Duplicate foam shape third time. Put this layer below all of foam shape layers. Use it to create shadow effect. Move this shape left(2px) and down(1px). Apply Gaussian filter to it(~0.6). Load selection for original foam shape and remove selected area form shadow layer. Erase shade contour in red marked area with Eraser Tool.
.jpg)
Apply light brown gradient to shadow with following settings.
.jpg)
Create a new empty layer, choose round brush(18-20px). Draw bubbles texture next to the top contour Apply following setting for the brush and use colors close to foam shades. In order to pick right color use Eyedropper tool
 .
..jpg)
.jpg)
.jpg)
Change brush settings a bit, draw bubbles texture in a new layer with Bevel and Emboss effect. Apply Fill = %20 to this layer.
.jpg)
.jpg)
.jpg)
Bevel and Emboss, Inner shadow settings for created bubbles.
.jpg)
.jpg)
Create one more new layer for bubbles texture, fill it with bubbles circles without any layer style settings, but make them translucent or apply Soft Light Blending mode.
.jpg)
You may add more small bubbles with Overlay setting.
.jpg)
Group glass layers(except handle and leaking foam, in other words, group green marked layers), copy the created group and merge it. Correct Contrast setting for merged duplicate, Image > Adjustment > Brightness/Contrast.
.jpg)
Then apply Gaussian Blur filter to it.
.jpg)
Filter > Noise > Add Noise.
.jpg)
You should have something similar:
.jpg)
Filter > Distort > Glass.
.jpg)
In order to create dewy gall effect, download and insert special pattern. place pattern layer between handle and glass layers.
.jpg)
Open Channels palette. Make active on of the channels(red for example) and click small icon to load selection.
.jpg)
Return to layer palette, keep selection active, choose blurred glass layer and Layer mask to it (click layer mask icon).
.jpg)
You should have something like this. Load selection for original glass shape, invert selection and erase outside contour from blurred layer.
.jpg)
Draw white drops in a new layer.
.jpg)
Use similar settings as for bubbles brush, but with white color and without Wet Edges.
.jpg)
Use following layer style effects for them.
.jpg)
.jpg)
.jpg)
.jpg)
.jpg)
.jpg)
.jpg)
In order to create reflection, duplicate group of glass layers once again(without leaking foam and handle).
Merge group and apply Flip Vertical transformation to it, move created layer down. Duplicate handle layers too. Merge duplicate and apply flip transformation as for glass previously. Keep glass and handle reflections in separate layers.
.jpg)
Apply Warp transformation for glass reflection like on the screen shots below.
.jpg)
.jpg)
Merge handle and glass reflections.
.jpg)
Add Layer Mask to created layer, Fill it wit black and white linear gradient. Load selection for the Mask(Ctrl + click to mask thumbnail). Invert selection, make active reflection thumbnail and apply Gaussian Blur filter to selected area(~30). Apply Opacity 70% for this layer.
.jpg)
Draw black ellipse with Ellipse Tool
 .
..jpg)
Add Layer Mask, fill it with linear black and white gradient just like on the screen shot.
.jpg)
Load selection for the Mask(Ctrl + click to mask thumbnail). Invert selection, make active reflection thumbnail and apply Gaussian Blur filter to selected area(~45). Apply Opacity 25% for this layer.
.jpg)
And here is result!

Hope you can learn something new from this tutorial.
I feel really glad if you give me feedback through comment below. Soon i am going to show more interesting & innovative tutorials so please keep visit our blog. That’s for now.
Have fun!
Feel free to contact with Clipping Design for clipping path service, image editing service, image masking service or any kind of design support.
Thank you…
Credit: alfoart.com
No comments:
Post a Comment