Step 1
Open a new document: 1250 px X 850 px.
Fill it with black color # 000000
Resolution of: 125.

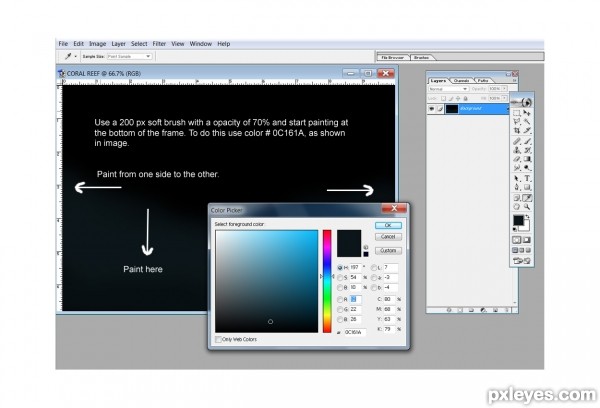
Step 2
We'll start painting the background, to do this, use a 200 px soft brush, and opacity of 70%.
Color # 0C161A
Start painting at the bottom of the frame, as shown in image.
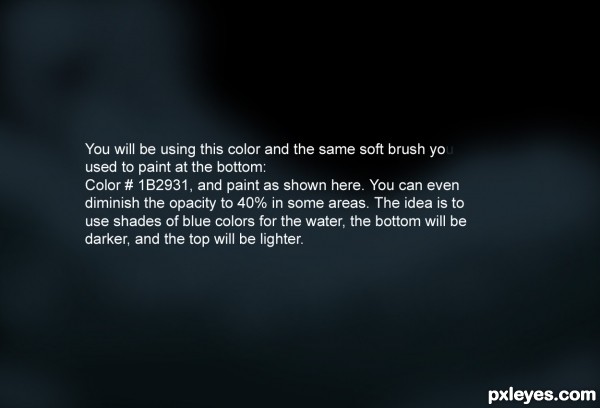
Step 3
You'll be using the same brush you use to paint before, but this time,
use this color # 1B2931.
Paint the area shown in the image. You can lower the opacity to 40%.
The idea is to get some shades of blue all around to make the water. The bottom will be darker, and the top will be lighter.
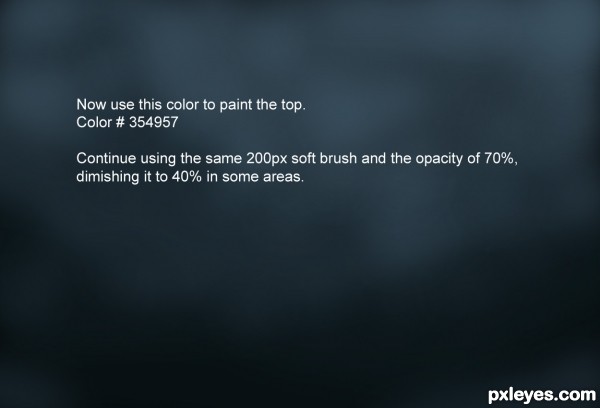
Step 4
Use color # 354957, to paint the top.
Continue using the same 200 px soft brush, opacity of 70%, lowering it to 40% in some areas.
Step 5
Use color # 878088, to give a kind of highlight at the right top of the frame. There is a reason to do this, as you will see in the next steps.
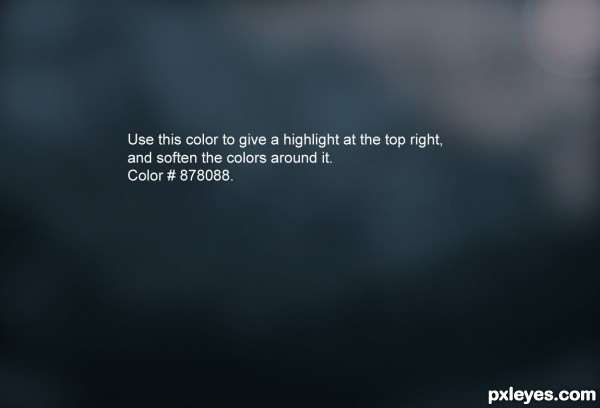
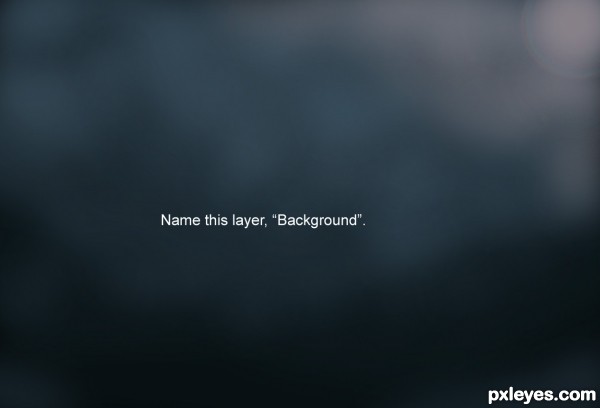
Step 6
Name this layer, "Background".
Step 7
This is the image, we will be using for the making of our coral reef. The source image was provided by pxleyes for a contest. You'll find the link to download the image in the next step.
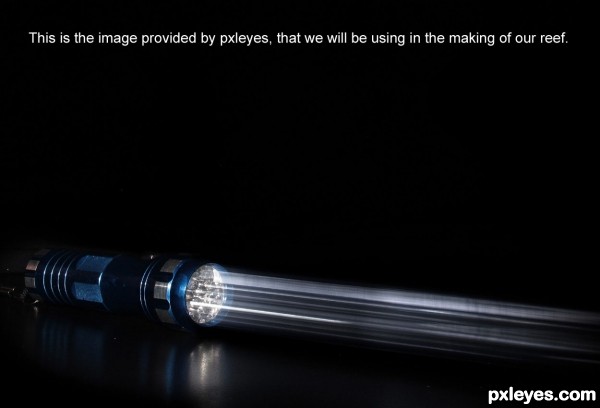
Step 8
This is the link to download the image of the light torch.
http://www.pxleyes.com/photoshop-contest/19285/light-torch.html
The image is shown below.
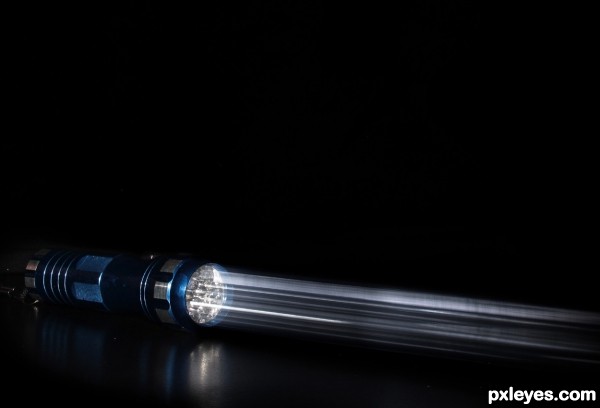
Step 9
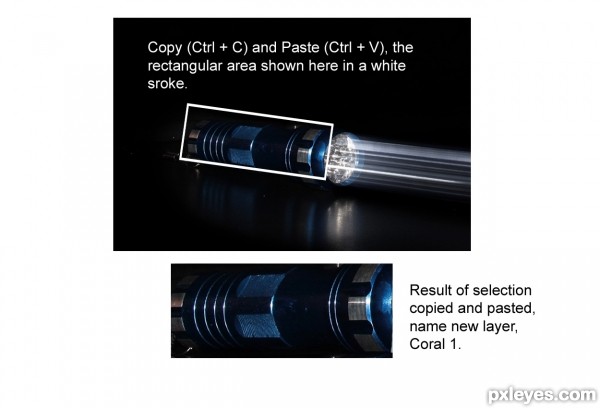
Copy (Ctrl + C) and Paste (Ctrl + V) the rectangular area marked in a white frame.
Name new layer, "Coral 1".
We'll change the name for this layer, later.
Step 10
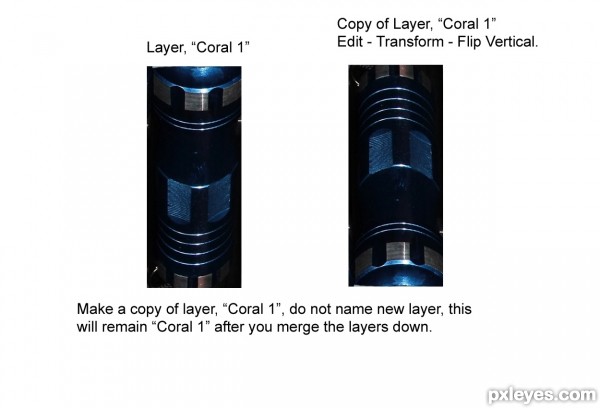
Make a copy of layer "Coral 1", do not name this layer.
Edit - Transform - Flip Vertical (For layer Coral Copy).
Place the two layers together, and merge them. Layer name will remain "Coral 1".
Step 11
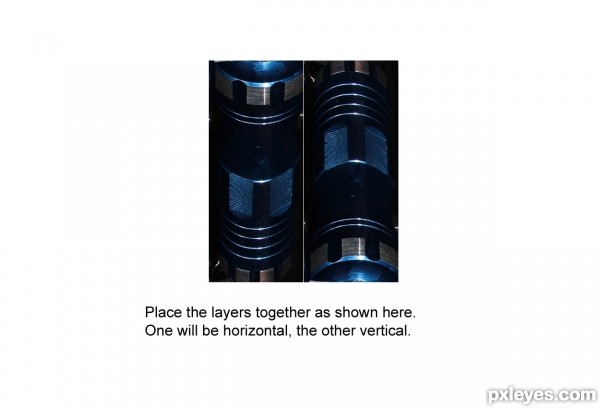
Place the two layers together as shown in image.
Step 12
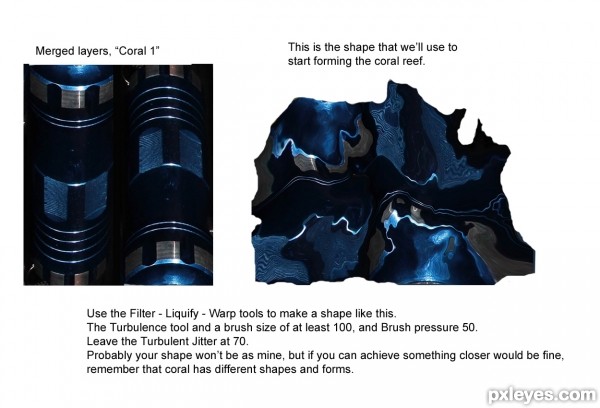
For this step, you'll be using the Filter - Liquify - Warp tools.
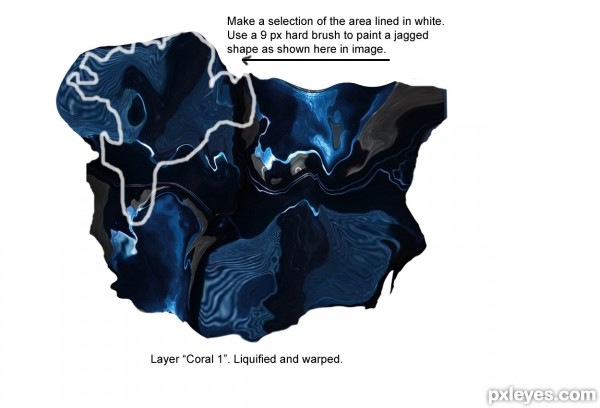
Liquify, Warp, and use the Turbulence tools to get this form.
Brush size 100 ........... Brush Pressure 50% ............... Turbulence Jitter 70.
Probably you will get a more interesting form. It will be ok, do your best! Remember that corals have different shapes and forms.
Step 13
Use a hard 5 or 9 px brush and a white color to paint a jagged edge over the top of the shape we'll use to make the coral. I did it in a new layer, but do not name it, as you will delete it after finishing.
Step 14
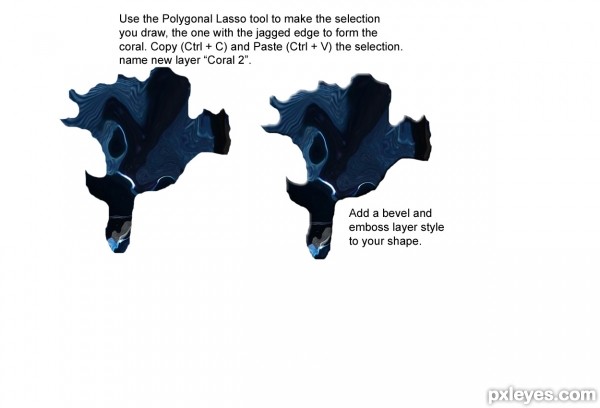
Use the Polygonal Lasso Tool (L), and work over the jagged line you draw over the shape for the coral.
Copy (Ctrl + C) and Paste (Ctrl + V) the selection. Name new layer, "Coral 2".
Add a Bevel and Emboss layer style to the shape.
Step 15
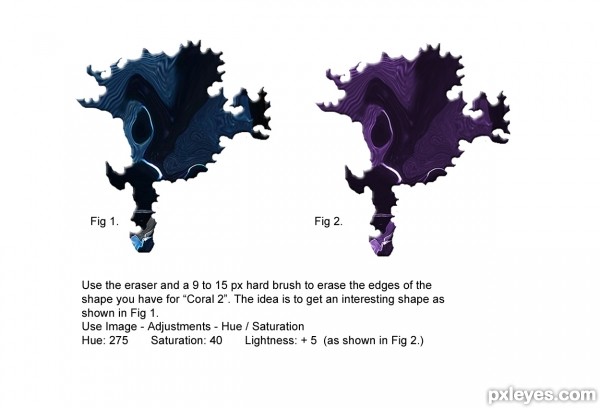
Use the Eraser Tool (E) to erase some of the edges for "Coral 2", the idea of erasing around the edge, is to get an interesting shape. Fig 1.
Image - Adjustments - Hue / Saturation.
Hue: 275 Saturation: 40 Lightness: +5 As shown in Fig 2.
Step 16
Filter - Noise - Add Noise.
Amount: 3.00%
Use the Dodge Tool (O), to dodge the area marked in red. Exposure: 50%.
Use the Burn Tool (O), to burn the area marked in blue. Exposure: 30%.

Step 17
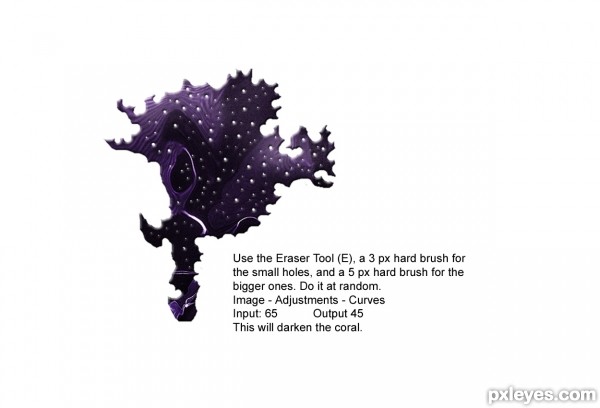
Make some holes in the coral. Use the Erase Tool (E).
Use a 3 px hard brush for the small holes, and a 5px hard brush for the bigger holes. You can do it at random.
Image - Adjustments - Curves.
Input: 65.
Output: 45.
This will darken the coral a little.
Step 18
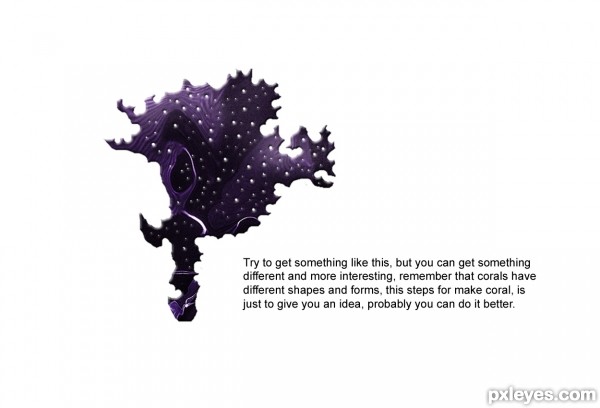
This is the way your coral should look. It does not matter if you get a different shape or form, just try to get the closest shape possible. As I told you, corals come in different shapes, colors, and forms. So, do not get dissapointed, try, and try again. You'll do ok. Practice makes a master.
Step 19
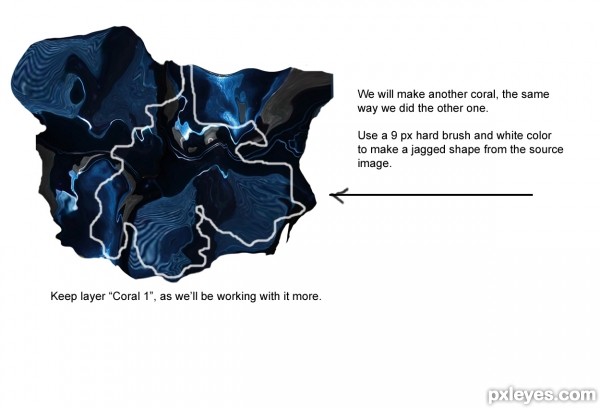
We'll make another coral the same way we did "Coral 2". Follow the same procedure we did. Draw the white outline in a new layer, you can erase it or delete it, or trash it. Look at the image, this time, we'll get a different shape and texture for this coral. DO NOT cut or delete part of shape for "Coral 1",remember that I told you, this form is important, we will make the reef from it.
Step 20
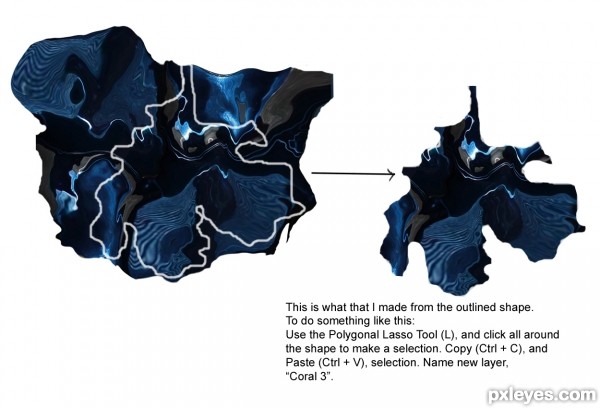
Remember to use the Polygonal Lasso Tool (L), and work along the jagged area as you did before.Copy ( Ctrl + C ) and Paste ( Ctrl + V ), the selection. Name new layer, "Coral 3".
Step 21
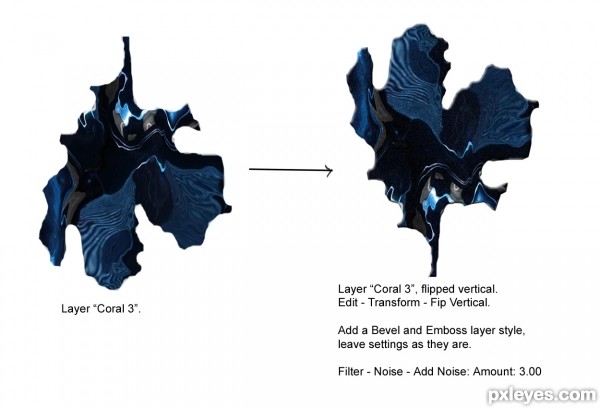
Edit - Transform - Flip Vertical (For layer, "Coral 3").
Add a Bevel and Emboss layer style, leave settings as they are.
Filter - Noise - Add Noise.
Amount: 3.00%
Step 22
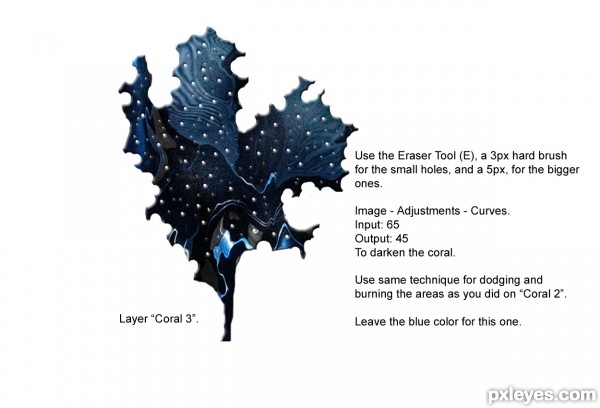
Use the Eraser Tool (E), same way you did before, use same small brushes for the holes as shown in image.
Image - Adjustments - Curves.
Input: 65.
Output: 45.
To darken the coral.
Use the same technique for dodging and burning the areas on top and bottom of coral.
Leave the blue color for this one.
Step 23
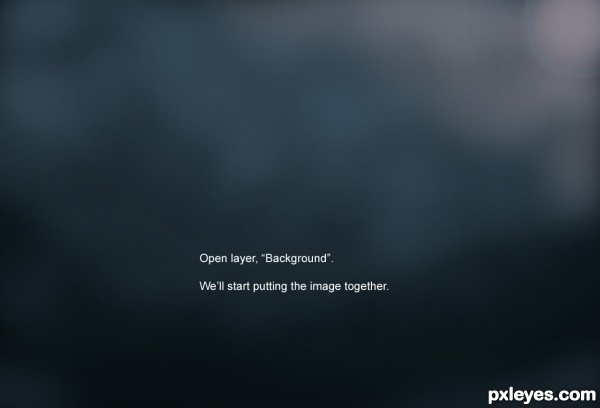
Open layer, "Background". We'll start putting the image together.
Step 24
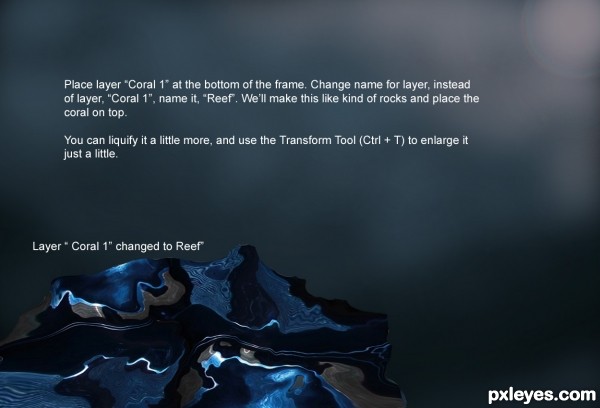
Place layer, "Coral 1" at the bottom of the frame, as shown in image. Change the name of this layer to:"Reef". The idea is to make a rocky ground to place the coral on top.
You can also liquify the shape to make it more interesting. Use the Transform Tool (Ctrl + T) to enlarge the area just a little.
Step 25
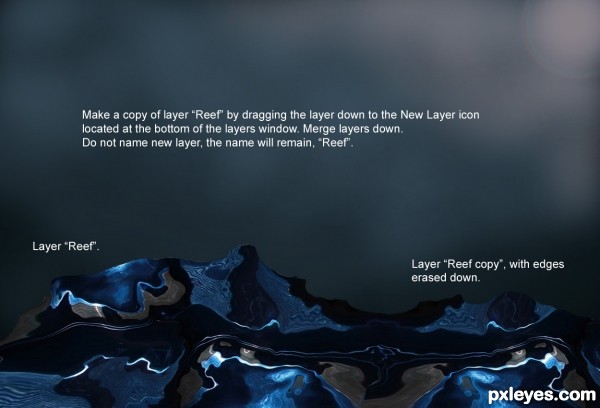
Make a copy of layer, "Reef", drag layer "Reef" to the bottom of the layers window, to the New layer icon. Do not name this layer, leave it as "Reef". Merge layers down.
Step 26
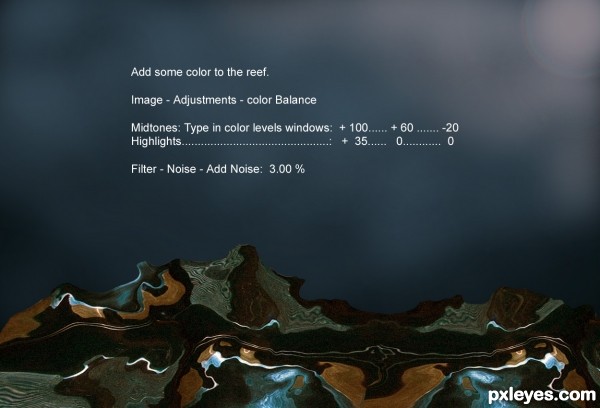
Add some color to the reef.
Image - Adjustments - Color Balance.
Midtones: +100 + 60 - 20.
Highlights: +35 0 0
Filter - Noise - Add Noise: Amount: 3.00%
Step 27
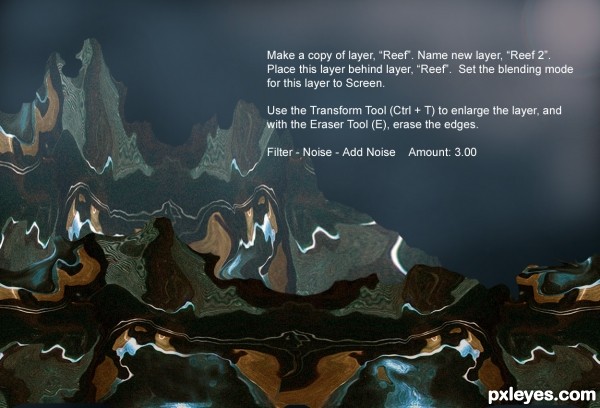
Make a copy of layer, "Reef" and name new layer, "Reef 2". Place this layer behind layer, "Reef".
Set layer blending mode to Screen.
Use the Transform Tool (Ctrl + T) to enlarge the reef, erase some of the edges with the Eraser Tol (E).
Filter - Noise - Add Noise. Amount: 3.00%.
Step 28
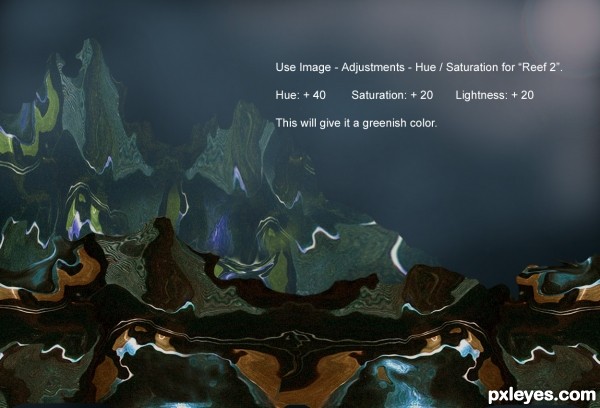
Use Image - Adjustments - Hue / Saturation for "Reef 2".
Hue: +40.
Saturation: +20.
Lightness: +20.
This will give the new reef a greenish color.
Step 29
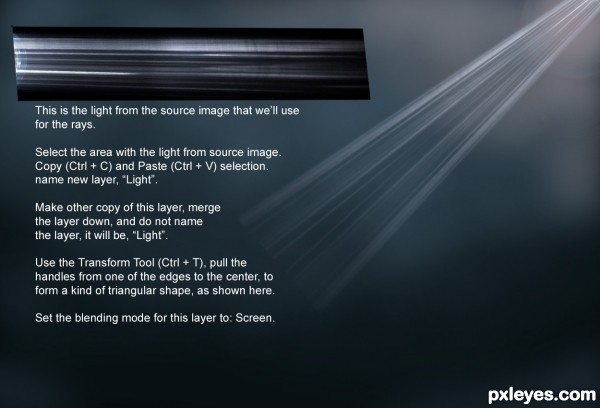
This is the light from the light torch, that we'll use to make some sun rays.
Select the area with the light, as shown in image. Copy (Ctrl + C) and Paste (Ctrl + V) the selection, name new layer, "Light".
Make another copy of this layer. Merge the layers down, layer will remain, "Light".
Use the Transform Tool (Ctrl + T), and pull the bottom handles all the way to form a kind of triangle, wider at the bottom and narrow at the top.
Set the layer blending mode to Screen.
Step 30
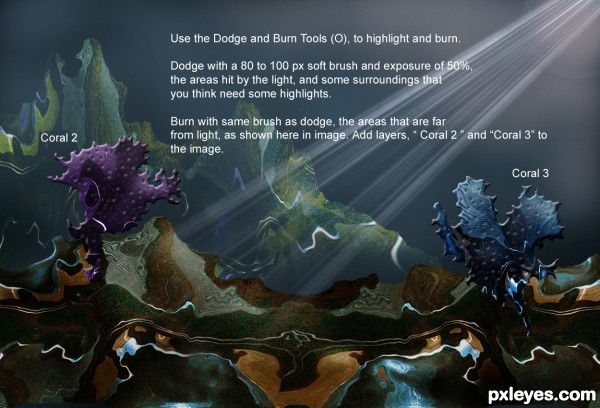
Place layers "Coral 2 and Coral 3" as shown in the image.
Use the Dodge and Burn Tools (O), to highlight and burn the areas hit by the sun rays.
To Dodge I used a 80 to 100 px soft brush and a exposure of 50%.
Burn with same brush, the areas that are far from the light, mostly at the bottom of the picture.
Step 31
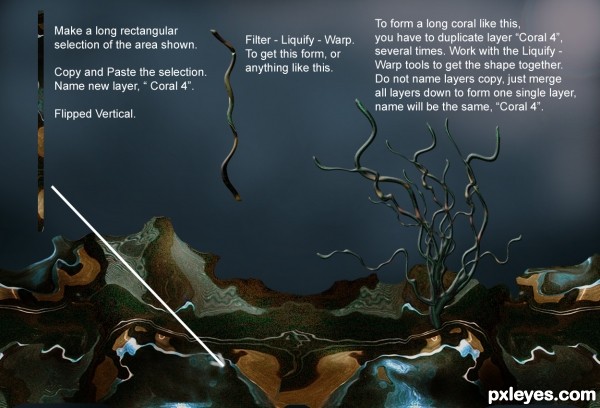
Make a long rectangular selection of the area shown in image. (The one at the left side of the picture.)
Copy (Ctrl + C) and Paste (Ctrl + V) selection, name new layer, "Coral 4".
Use the Filter - Liquify - Warp, to twist the shape of this layer, to for a kind of branch.
To form the shape of a coral as I have in the right side of the picture, you'll have to duplicate the layer several times. Use the Transform Tool (Ctrl + T),
to set the branches one on top of the other, and go back to the Liquify - Warp method, to shape the branches a little more.
When you are satisfied with the result, just merge all layers down to "Coral 4", and leave the name as it is, "Coral 4".
Step 32
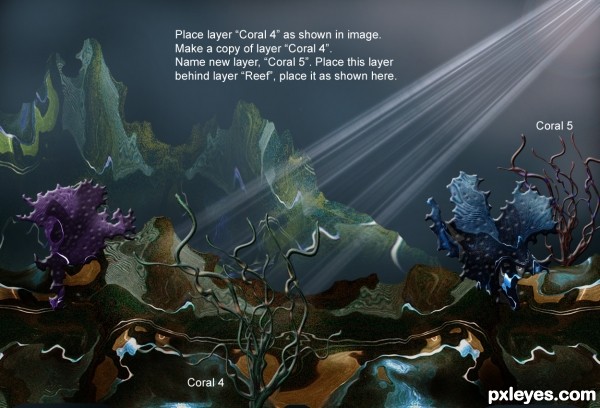
Place layer "Coral 4" as shown in image.
Make another copy of this layer, name new layer, "Coral 5", and place it behind layer, "Reef".
Step 33
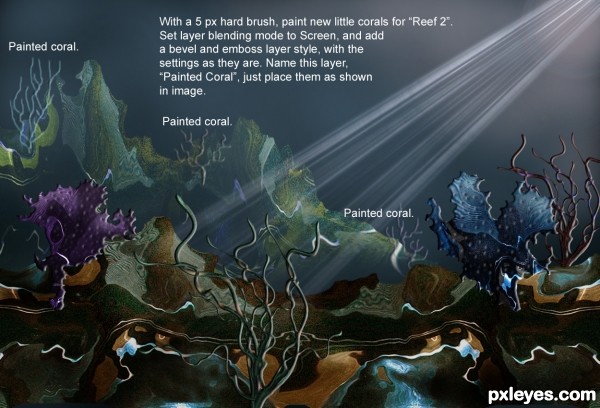
With a small 5px hard brush and some colors of your own, paint some little corals as shown in image.Add a layer style Bevel / Emboss while you draw. I used blue and brown colors for the ones I did. As it is a new layer, name it "Painted Coral".
Set the layer blending mode to Screen, and place the new little coral on top of layer "Reef 2".
Step 34
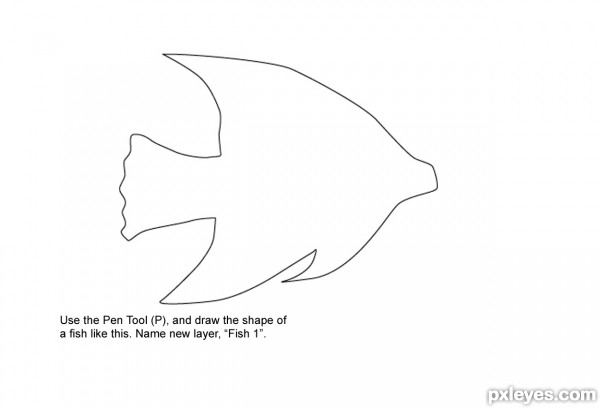
In a new layer and using the Pen Tool (P), draw the shape of a fish, as shown in image.
Name new layer, "Fish 1".
Step 35
In an other new layer, and using the Pen Tool (P) again, draw some lines inside the he body of the fish. Name new layer, "Fish Texture".

Step 36
We'll paint the fish now.
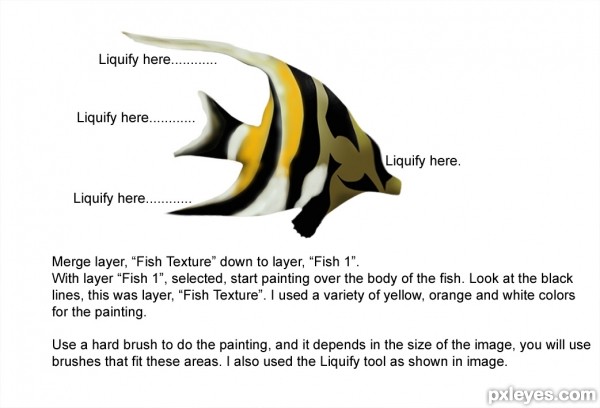
Merge down layer, "Fish Texture" and leave name for layer, "Fish 1".
You'll start painting inside the fish body, not the black lines, look at the image. I used a variety of yellow, white, and orange colors. I also used a hard brush 15 px, but you can use a bigger or smaller brush, depending the size of your drawing. Layer, "Fish 1", has to be selected to paint, in this way the color does not go out of the selection.
Use the Liquify - Warp tool to warp the body of the fish, as shown in image.
Step 37
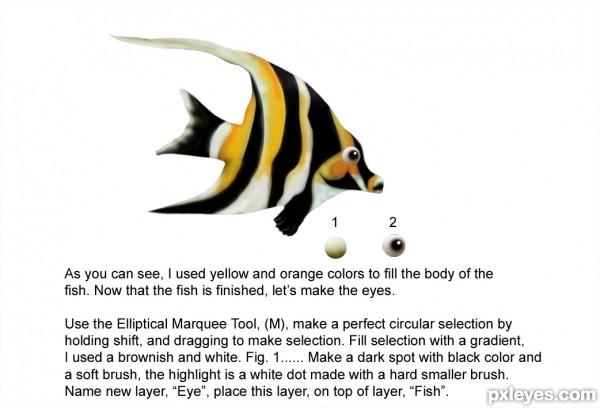
As you can see, I used the colors I told you, yellows, white, and orange to give the form and color to the fih. We will make the eye now.
Use the Elliptical Marquee Tool (M), to make a rounded selection, filled it with a gradient, I used white and a brownish color.
Make a dark spot on top the eye and make a highlight with white. Name new layer, "Eye" and it will be placed on top layer, "Fish 1".
Step 38
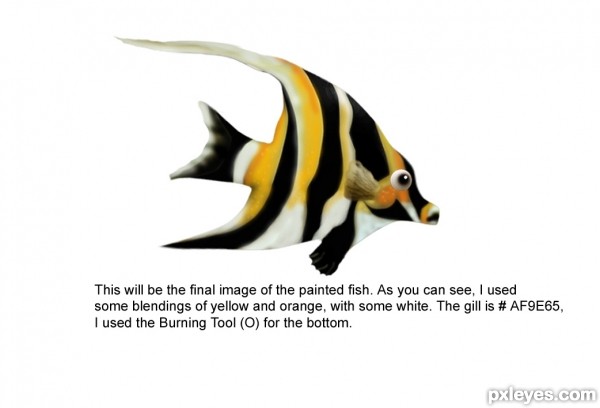
To finish the fish, add a gill to it. I used color # AF9E65.
Use the Burn Tool (O), for the bottom.
Step 39
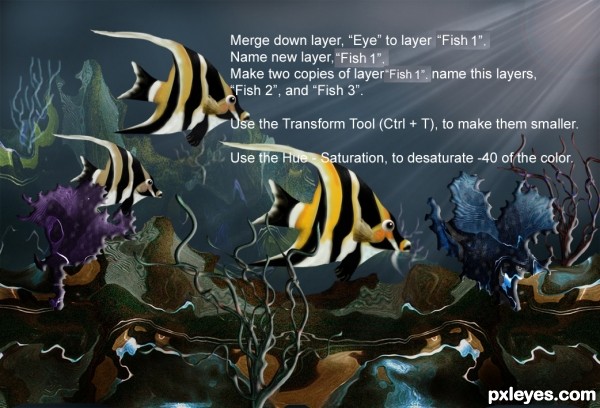
Merge down layer "Eye" to the "Fish 1", leave name for layer, "Fish 1".
Make two copies of layer "Fish 1", name new layers, "Fish 2" and "Fish 3".
Use the Transform Tool (Ctrl + T) to make them smaller, and place them as shown in image.
Lower the saturation for these new fish. Desaturate 40% of original colors.
Step 40
THE MAKING OF AN ANEMONAE.
To make the anemonae, Using the Rectangular Marquee Tool (M), make a long selection from source image as shown in Fig 1.
Copy (Ctrl + C) and Paste (Ctrl + V) selection, name new layer, "Anemonae"
Use Filter - Liquify - Warp, to get a shape or form as shown in Fig 2.
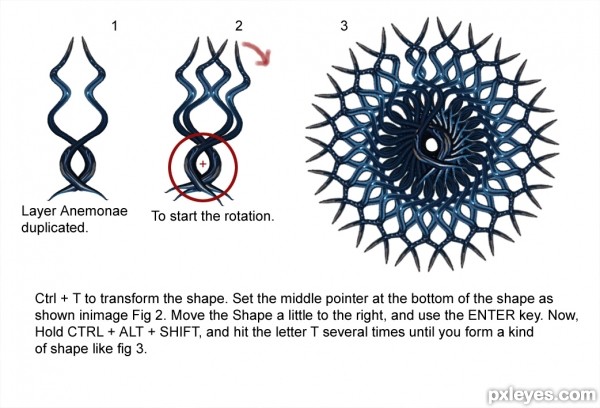
Duplicate layer, "Anemonae" and flip it Horizontal. Edit - Transform - Flip Horizontal. Fig 3.

Step 41
Use Ctrl + T, to transform the shape. Copy of layer "Anemonae" has to be on top to start the rotation, place the rotating point (Circled in red) at the same distance from the center, as shown in image. Move "Anemonae layer copy" just a little to the right, as shown in red arrow. Click on the ENTER KEY.
Now, HOLD down at the same time, CTRL + ALT + SHIFT, with one hand, and HIT THE LETTER T several times, you will see the image rotating. Fig 2.
It will give you a new layer, every time you hit letter T, but you can merge layers down after the complete circle is made, as shown in image. Fig 3.
Step 42
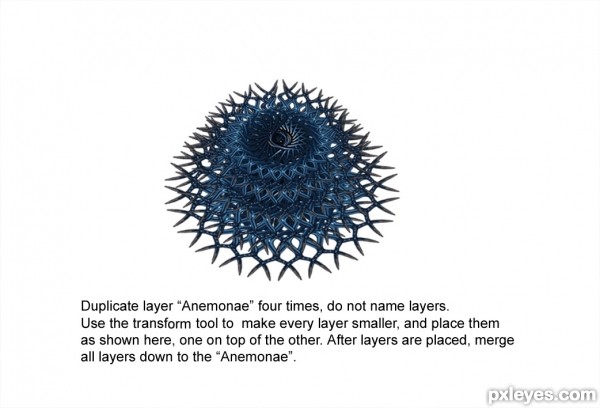
Leave layer name as: "Anemonae".
Duplicate layer, "Anemonae" four times, do not name the layers yet. You'll merge them down.
Using the Transform to make the copies of this layer smaller and smaller. Place them one on top of the other. The one at the top has to be the smaller one. When you have all layers placed as shown in image.Merge layers down, layer, remains: "Anemonae".
Step 43
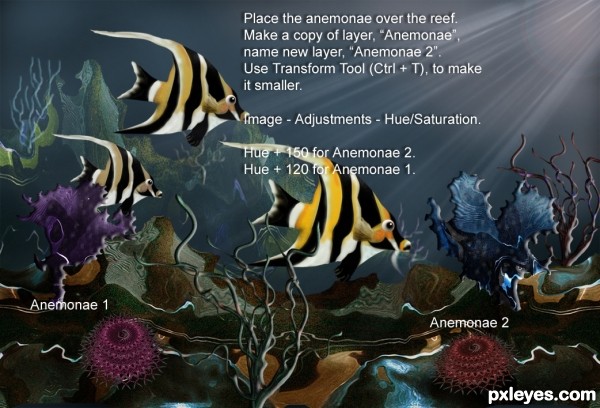
Place layer "Anemonae" over the "Reef". Make a copy of layer, "Anemonae" name new layer, "Anemonae 2". Make it smaller using the Transform Tool (Ctrl + T), and place it as shown in image.
Use Image - Adjustments - Hue / Saturation for both "Anemonaes"
Anemonae 1: Hue + 120.
Anemonae 2: Hue + 150.
As you can see the colors are almost similar, but it is fine to leave them like that, unless you want to try other colors, just increase or decrease Hue and Saturation.
Step 44
There is an empty space at the right side of the frame. Make a copy of layer, "Reef 2". Name new layer, "Reef 3".
Place it behind layer, "Reef 2".
Add Hue / Saturation to the new reef.
Hue: -50.
Saturation - 80.
Lower Opacity to 60%.

Step 45
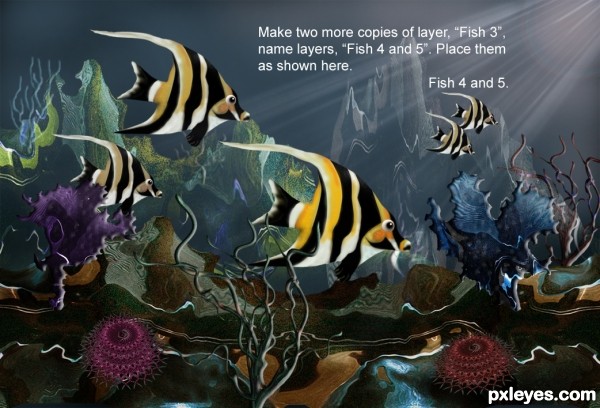
Make two more copies of layer, "Fish 3", name new layers "Fish 4 and 5", and place them as shown in image.
Step 46
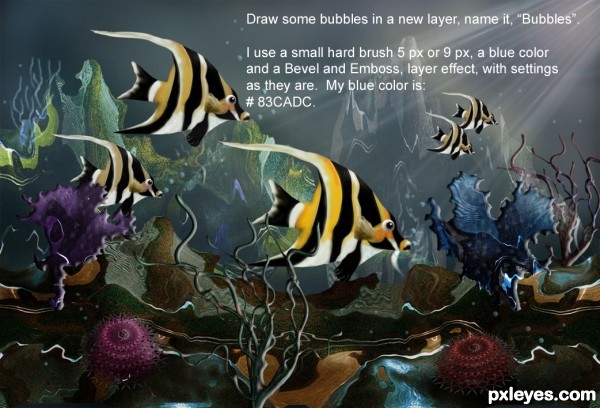
Make some little bubbles and add them to the image.
Use a hard 3 px brush, for smaller and hard 5px brush, for bigger bubbles. I used a blue color # 83CADC.
Add a bevel and emboss layer effect to the bubbles, and start drawing them, they look better if you click three or four times while painting them.
Step 47
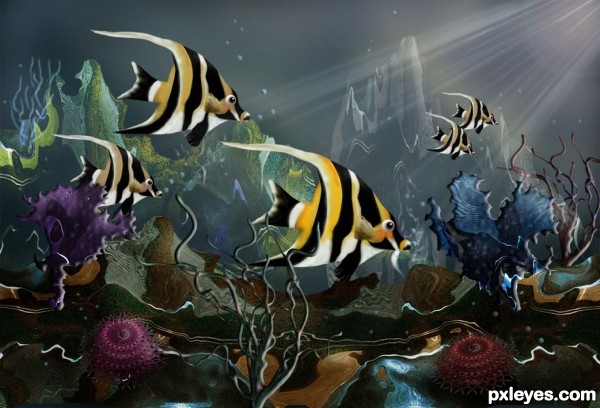
Well, thank you all who tried this tutorial. I really appreciate your patience and dedication to follow this SBS guide to the end. This is our final image.
I will also appreciate your questions about some steps or the tutorial itself, we, at pxleyes, a community of artists and myself will be willing to give you a hand. You can also contact me, go to my profile and send me a PM and I will answer you.
I hope you enjoyed working with the tools provided by PS for this tutorial as I did, and I also hope you learned a lot from it. Thanks again and good luck in your journey through ART.
Hope you can learn something new from this tutorial.
I feel really glad if you give me feedback through comment below. Soon i am going to show more interesting & innovative tutorials so please keep visit our blog. That’s for now.
Have fun!
Feel free to contact with Clipping Design for clipping path service, image editing service, image masking service or any kind of design support.
Thank you…
Open a new document: 1250 px X 850 px.
Fill it with black color # 000000
Resolution of: 125.
Step 2
We'll start painting the background, to do this, use a 200 px soft brush, and opacity of 70%.
Color # 0C161A
Start painting at the bottom of the frame, as shown in image.
Step 3
You'll be using the same brush you use to paint before, but this time,
use this color # 1B2931.
Paint the area shown in the image. You can lower the opacity to 40%.
The idea is to get some shades of blue all around to make the water. The bottom will be darker, and the top will be lighter.
Step 4
Use color # 354957, to paint the top.
Continue using the same 200 px soft brush, opacity of 70%, lowering it to 40% in some areas.
Step 5
Use color # 878088, to give a kind of highlight at the right top of the frame. There is a reason to do this, as you will see in the next steps.
Step 6
Name this layer, "Background".
Step 7
This is the image, we will be using for the making of our coral reef. The source image was provided by pxleyes for a contest. You'll find the link to download the image in the next step.
Step 8
This is the link to download the image of the light torch.
http://www.pxleyes.com/photoshop-contest/19285/light-torch.html
The image is shown below.
Step 9
Copy (Ctrl + C) and Paste (Ctrl + V) the rectangular area marked in a white frame.
Name new layer, "Coral 1".
We'll change the name for this layer, later.
Step 10
Make a copy of layer "Coral 1", do not name this layer.
Edit - Transform - Flip Vertical (For layer Coral Copy).
Place the two layers together, and merge them. Layer name will remain "Coral 1".
Step 11
Place the two layers together as shown in image.
Step 12
For this step, you'll be using the Filter - Liquify - Warp tools.
Liquify, Warp, and use the Turbulence tools to get this form.
Brush size 100 ........... Brush Pressure 50% ............... Turbulence Jitter 70.
Probably you will get a more interesting form. It will be ok, do your best! Remember that corals have different shapes and forms.
Step 13
Use a hard 5 or 9 px brush and a white color to paint a jagged edge over the top of the shape we'll use to make the coral. I did it in a new layer, but do not name it, as you will delete it after finishing.
Step 14
Use the Polygonal Lasso Tool (L), and work over the jagged line you draw over the shape for the coral.
Copy (Ctrl + C) and Paste (Ctrl + V) the selection. Name new layer, "Coral 2".
Add a Bevel and Emboss layer style to the shape.
Step 15
Use the Eraser Tool (E) to erase some of the edges for "Coral 2", the idea of erasing around the edge, is to get an interesting shape. Fig 1.
Image - Adjustments - Hue / Saturation.
Hue: 275 Saturation: 40 Lightness: +5 As shown in Fig 2.
Step 16
Filter - Noise - Add Noise.
Amount: 3.00%
Use the Dodge Tool (O), to dodge the area marked in red. Exposure: 50%.
Use the Burn Tool (O), to burn the area marked in blue. Exposure: 30%.
Step 17
Make some holes in the coral. Use the Erase Tool (E).
Use a 3 px hard brush for the small holes, and a 5px hard brush for the bigger holes. You can do it at random.
Image - Adjustments - Curves.
Input: 65.
Output: 45.
This will darken the coral a little.
Step 18
This is the way your coral should look. It does not matter if you get a different shape or form, just try to get the closest shape possible. As I told you, corals come in different shapes, colors, and forms. So, do not get dissapointed, try, and try again. You'll do ok. Practice makes a master.
Step 19
We'll make another coral the same way we did "Coral 2". Follow the same procedure we did. Draw the white outline in a new layer, you can erase it or delete it, or trash it. Look at the image, this time, we'll get a different shape and texture for this coral. DO NOT cut or delete part of shape for "Coral 1",remember that I told you, this form is important, we will make the reef from it.
Step 20
Remember to use the Polygonal Lasso Tool (L), and work along the jagged area as you did before.Copy ( Ctrl + C ) and Paste ( Ctrl + V ), the selection. Name new layer, "Coral 3".
Step 21
Edit - Transform - Flip Vertical (For layer, "Coral 3").
Add a Bevel and Emboss layer style, leave settings as they are.
Filter - Noise - Add Noise.
Amount: 3.00%
Step 22
Use the Eraser Tool (E), same way you did before, use same small brushes for the holes as shown in image.
Image - Adjustments - Curves.
Input: 65.
Output: 45.
To darken the coral.
Use the same technique for dodging and burning the areas on top and bottom of coral.
Leave the blue color for this one.
Step 23
Open layer, "Background". We'll start putting the image together.
Step 24
Place layer, "Coral 1" at the bottom of the frame, as shown in image. Change the name of this layer to:"Reef". The idea is to make a rocky ground to place the coral on top.
You can also liquify the shape to make it more interesting. Use the Transform Tool (Ctrl + T) to enlarge the area just a little.
Step 25
Make a copy of layer, "Reef", drag layer "Reef" to the bottom of the layers window, to the New layer icon. Do not name this layer, leave it as "Reef". Merge layers down.
Step 26
Add some color to the reef.
Image - Adjustments - Color Balance.
Midtones: +100 + 60 - 20.
Highlights: +35 0 0
Filter - Noise - Add Noise: Amount: 3.00%
Step 27
Make a copy of layer, "Reef" and name new layer, "Reef 2". Place this layer behind layer, "Reef".
Set layer blending mode to Screen.
Use the Transform Tool (Ctrl + T) to enlarge the reef, erase some of the edges with the Eraser Tol (E).
Filter - Noise - Add Noise. Amount: 3.00%.
Step 28
Use Image - Adjustments - Hue / Saturation for "Reef 2".
Hue: +40.
Saturation: +20.
Lightness: +20.
This will give the new reef a greenish color.
Step 29
This is the light from the light torch, that we'll use to make some sun rays.
Select the area with the light, as shown in image. Copy (Ctrl + C) and Paste (Ctrl + V) the selection, name new layer, "Light".
Make another copy of this layer. Merge the layers down, layer will remain, "Light".
Use the Transform Tool (Ctrl + T), and pull the bottom handles all the way to form a kind of triangle, wider at the bottom and narrow at the top.
Set the layer blending mode to Screen.
Step 30
Place layers "Coral 2 and Coral 3" as shown in the image.
Use the Dodge and Burn Tools (O), to highlight and burn the areas hit by the sun rays.
To Dodge I used a 80 to 100 px soft brush and a exposure of 50%.
Burn with same brush, the areas that are far from the light, mostly at the bottom of the picture.
Step 31
Make a long rectangular selection of the area shown in image. (The one at the left side of the picture.)
Copy (Ctrl + C) and Paste (Ctrl + V) selection, name new layer, "Coral 4".
Use the Filter - Liquify - Warp, to twist the shape of this layer, to for a kind of branch.
To form the shape of a coral as I have in the right side of the picture, you'll have to duplicate the layer several times. Use the Transform Tool (Ctrl + T),
to set the branches one on top of the other, and go back to the Liquify - Warp method, to shape the branches a little more.
When you are satisfied with the result, just merge all layers down to "Coral 4", and leave the name as it is, "Coral 4".
Step 32
Place layer "Coral 4" as shown in image.
Make another copy of this layer, name new layer, "Coral 5", and place it behind layer, "Reef".
Step 33
With a small 5px hard brush and some colors of your own, paint some little corals as shown in image.Add a layer style Bevel / Emboss while you draw. I used blue and brown colors for the ones I did. As it is a new layer, name it "Painted Coral".
Set the layer blending mode to Screen, and place the new little coral on top of layer "Reef 2".
Step 34
In a new layer and using the Pen Tool (P), draw the shape of a fish, as shown in image.
Name new layer, "Fish 1".
Step 35
In an other new layer, and using the Pen Tool (P) again, draw some lines inside the he body of the fish. Name new layer, "Fish Texture".
Step 36
We'll paint the fish now.
Merge down layer, "Fish Texture" and leave name for layer, "Fish 1".
You'll start painting inside the fish body, not the black lines, look at the image. I used a variety of yellow, white, and orange colors. I also used a hard brush 15 px, but you can use a bigger or smaller brush, depending the size of your drawing. Layer, "Fish 1", has to be selected to paint, in this way the color does not go out of the selection.
Use the Liquify - Warp tool to warp the body of the fish, as shown in image.
Step 37
As you can see, I used the colors I told you, yellows, white, and orange to give the form and color to the fih. We will make the eye now.
Use the Elliptical Marquee Tool (M), to make a rounded selection, filled it with a gradient, I used white and a brownish color.
Make a dark spot on top the eye and make a highlight with white. Name new layer, "Eye" and it will be placed on top layer, "Fish 1".
Step 38
To finish the fish, add a gill to it. I used color # AF9E65.
Use the Burn Tool (O), for the bottom.
Step 39
Merge down layer "Eye" to the "Fish 1", leave name for layer, "Fish 1".
Make two copies of layer "Fish 1", name new layers, "Fish 2" and "Fish 3".
Use the Transform Tool (Ctrl + T) to make them smaller, and place them as shown in image.
Lower the saturation for these new fish. Desaturate 40% of original colors.
Step 40
THE MAKING OF AN ANEMONAE.
To make the anemonae, Using the Rectangular Marquee Tool (M), make a long selection from source image as shown in Fig 1.
Copy (Ctrl + C) and Paste (Ctrl + V) selection, name new layer, "Anemonae"
Use Filter - Liquify - Warp, to get a shape or form as shown in Fig 2.
Duplicate layer, "Anemonae" and flip it Horizontal. Edit - Transform - Flip Horizontal. Fig 3.
Step 41
Use Ctrl + T, to transform the shape. Copy of layer "Anemonae" has to be on top to start the rotation, place the rotating point (Circled in red) at the same distance from the center, as shown in image. Move "Anemonae layer copy" just a little to the right, as shown in red arrow. Click on the ENTER KEY.
Now, HOLD down at the same time, CTRL + ALT + SHIFT, with one hand, and HIT THE LETTER T several times, you will see the image rotating. Fig 2.
It will give you a new layer, every time you hit letter T, but you can merge layers down after the complete circle is made, as shown in image. Fig 3.
Step 42
Leave layer name as: "Anemonae".
Duplicate layer, "Anemonae" four times, do not name the layers yet. You'll merge them down.
Using the Transform to make the copies of this layer smaller and smaller. Place them one on top of the other. The one at the top has to be the smaller one. When you have all layers placed as shown in image.Merge layers down, layer, remains: "Anemonae".
Step 43
Place layer "Anemonae" over the "Reef". Make a copy of layer, "Anemonae" name new layer, "Anemonae 2". Make it smaller using the Transform Tool (Ctrl + T), and place it as shown in image.
Use Image - Adjustments - Hue / Saturation for both "Anemonaes"
Anemonae 1: Hue + 120.
Anemonae 2: Hue + 150.
As you can see the colors are almost similar, but it is fine to leave them like that, unless you want to try other colors, just increase or decrease Hue and Saturation.
Step 44
There is an empty space at the right side of the frame. Make a copy of layer, "Reef 2". Name new layer, "Reef 3".
Place it behind layer, "Reef 2".
Add Hue / Saturation to the new reef.
Hue: -50.
Saturation - 80.
Lower Opacity to 60%.
Step 45
Make two more copies of layer, "Fish 3", name new layers "Fish 4 and 5", and place them as shown in image.
Step 46
Make some little bubbles and add them to the image.
Use a hard 3 px brush, for smaller and hard 5px brush, for bigger bubbles. I used a blue color # 83CADC.
Add a bevel and emboss layer effect to the bubbles, and start drawing them, they look better if you click three or four times while painting them.
Step 47
Well, thank you all who tried this tutorial. I really appreciate your patience and dedication to follow this SBS guide to the end. This is our final image.
I will also appreciate your questions about some steps or the tutorial itself, we, at pxleyes, a community of artists and myself will be willing to give you a hand. You can also contact me, go to my profile and send me a PM and I will answer you.
I hope you enjoyed working with the tools provided by PS for this tutorial as I did, and I also hope you learned a lot from it. Thanks again and good luck in your journey through ART.
Hope you can learn something new from this tutorial.
I feel really glad if you give me feedback through comment below. Soon i am going to show more interesting & innovative tutorials so please keep visit our blog. That’s for now.
Have fun!
Feel free to contact with Clipping Design for clipping path service, image editing service, image masking service or any kind of design support.
Thank you…
Credit:pxleyes.com
No comments:
Post a Comment