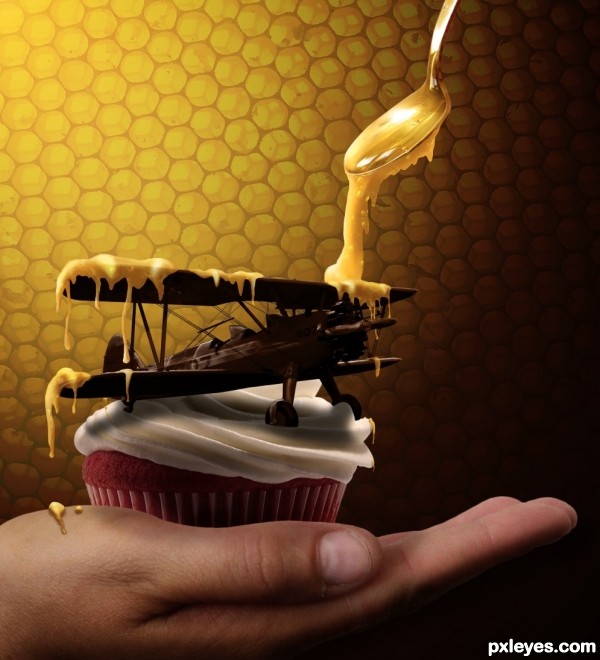
In this tutorial you will learn how to create an amazing Honey and Turn Everything into Chocolate in Photoshop. We use some of Photoshop’s best tricks. We’ll also use filters, adjustment layer. So let's have a look...
Step 1
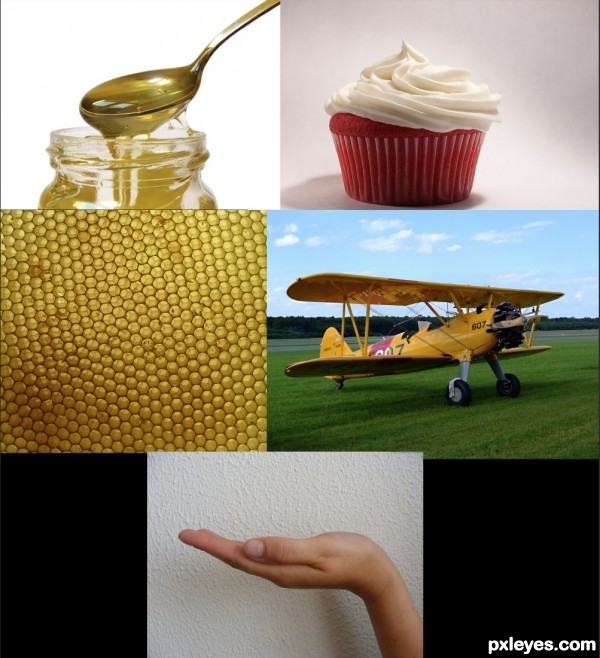
THE SOURCE IMAGES
These are the following links to the images I used to create this tutorial:
- Honeycomb
- Airplane (thanx to sed-rah-stock for the permission to use it)
- Hand
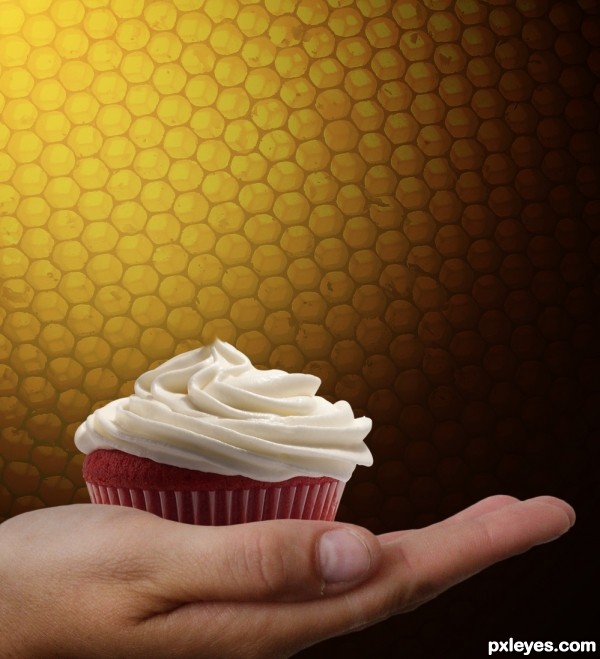
- Cupcake
- Tea Spoon
- Bubble Brushes
Here's a snapshot of all the 5 images together.
Step 2
THE BACKGROUND
I am not going to speak much on how I made the background, because we need to focus more on the chocolate and honey for this tutorial.
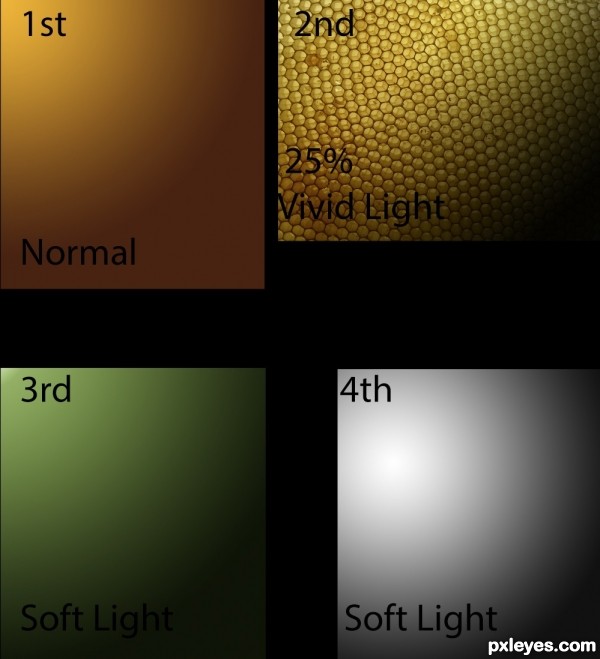
Create a new empty layer, width 2000, height 2200.
Just as shown on the image below, I used three different layers with three distinct radial gradients, plus, the honeycomb picture with an attached layer mask, in which I applied the same radial of the other three backgrounds, from white to black, to give the impression of fading and bending.
So, from the bottom to the top, use a yellow #f0b626 to brown #4a230f radial gradient on the first empty layer, press (G) or click on the gradient tool on the toll's palette; then, drag a line from the upper left to the lower right, It's up to you when to stop, try it different times until you like it most.
Next, add the honeycomb image, enlarge it a little, and set it to vivid light with 25% of opacity. Therefore, add a layer mask to it, and use a medium-big, soft, black brush on the mask to hide the lower right side; note that you can also use a gradient from white to black, just like you did for the previous layer.
Then, Create a new layer and use the same technique of the 1st one, but this time use a pure white to dark green #212b12 radial gradient, set it to soft light.
Do the same for the last new layer, the fourth, using a white to black gradient with soft light blending mode.
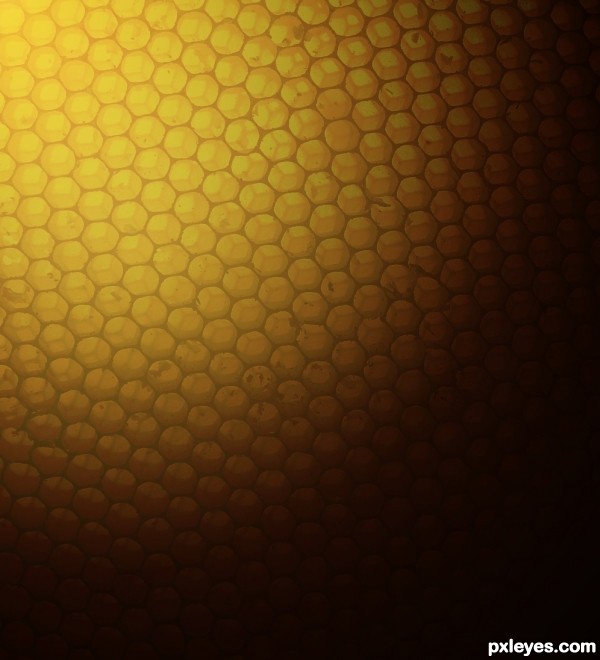
Step 3
This is the final result
Step 4
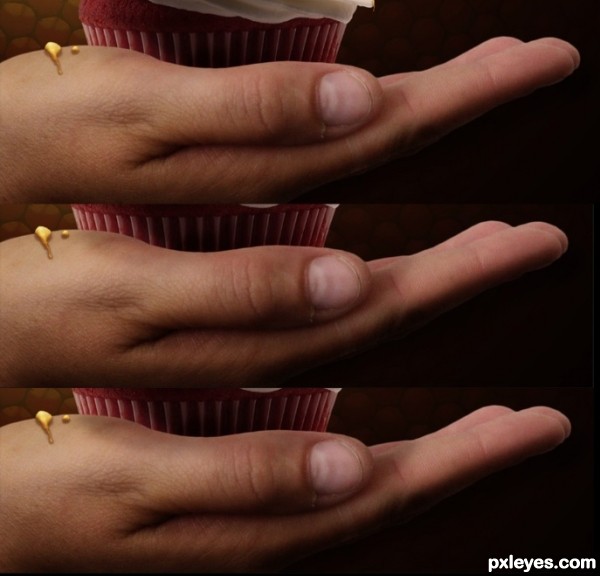
THE HAND
Import the image of the hand, enlarge and reflect it horizontally, and place it on the bottom of the image; then, duplicate it once, desaturate the copy, and set this one to soft light 45% in order to easily contrast the hand a little bit (there's no need to adjust it too much, because it already have a good exposure. As you can see, shadows and lights are yet in their proper positions.
Therefore, I am going to leave it like this, I will be back to the hand for the final blending and shadows retouches, probably at the end of this tutorial.

Step 5
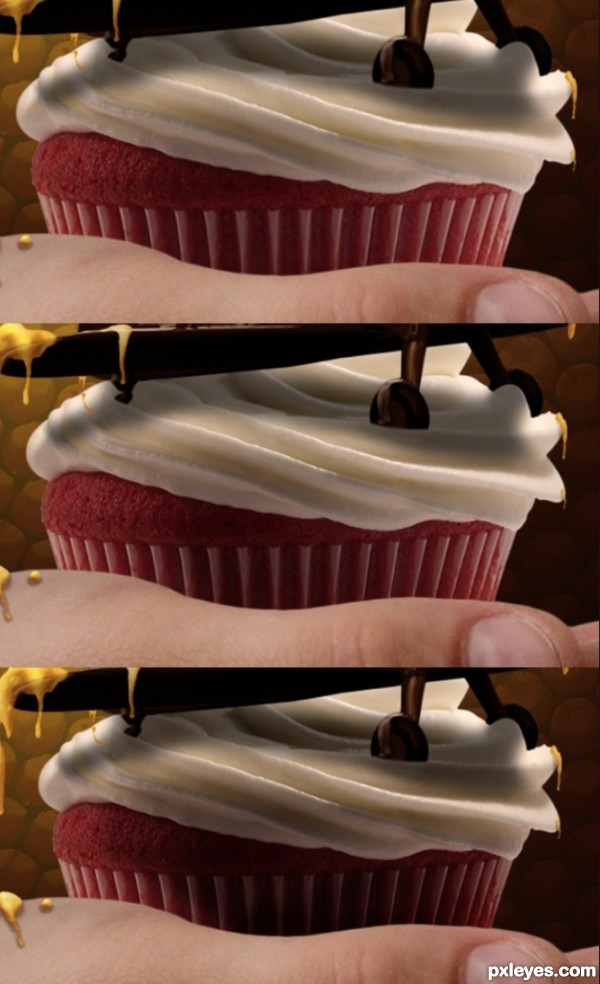
THE CUPCAKE
Once you have imported the cupcake and made a selection of it, use the same technique of copy, desaturate, etc, just like you did to the hand to contrast it. Hence, merge the two layers, and set the cupcake on top of the layer palette and try to settle it on the hand. Just as shown on the image below, the cupcake already fits good with the hand, and the lights too. So, I will be back to it later as well, now it's time to work on the chocolate airplane.
Step 6
THE AIRPLANE
Now I will show you how easily is to transform this airplane, and everything, into chocolate.
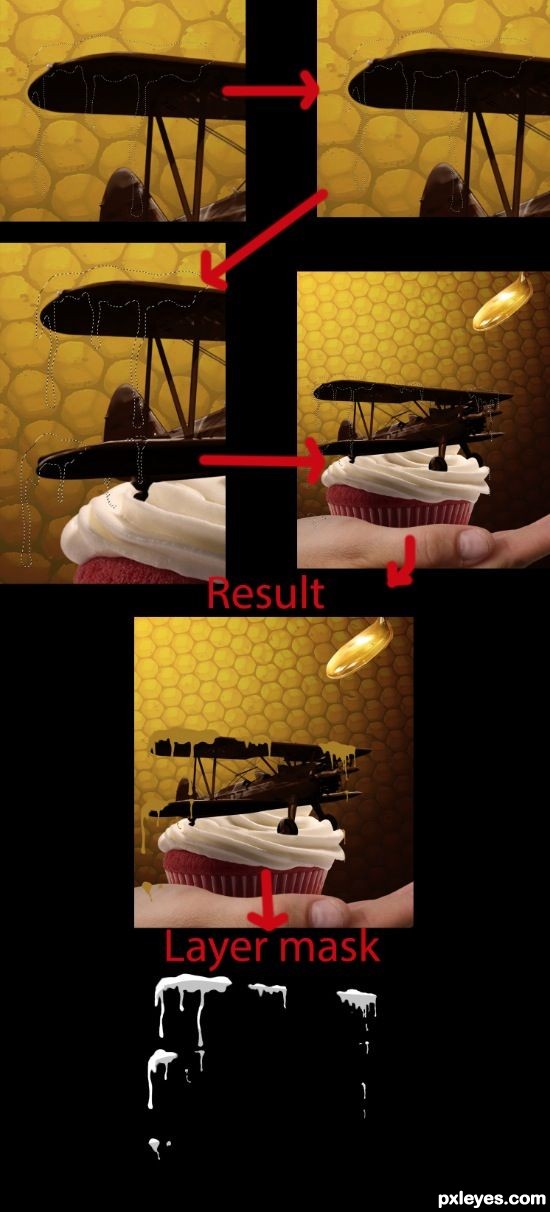
Import the correct image, note that this time a meticulous selection for the airplane is needed, as you can see in the image below, I decided to include the thin bars between the wings too. To do so, it's better to use the pen tool on selecting the airplane, for a more precise work. You can choose not to include the iron bars, but be careful to remove all the remaining parts that are in front of the plane body, I knew it would had be a longer work, so I gave up, but you can do it by using the clone tool or the spot healing brush; in my opinion, for a better job, it is always best to use the clone tool, but this is only up to you.
Once the selection is done, you can go ahead with the chocolate transformation.
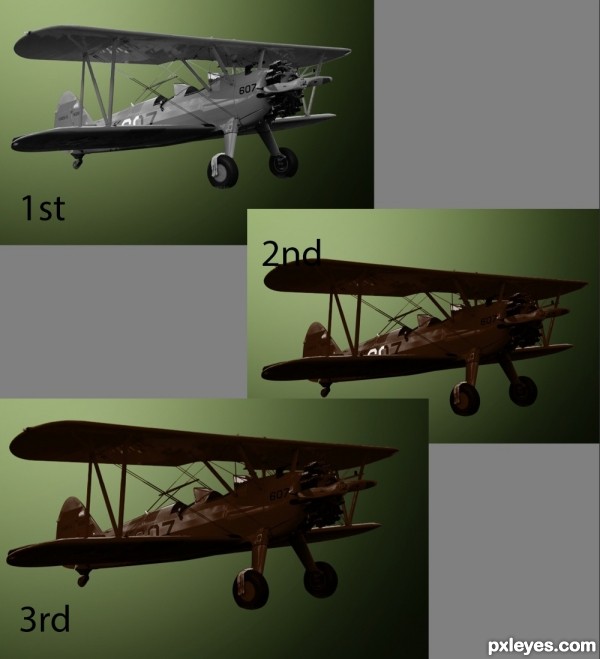
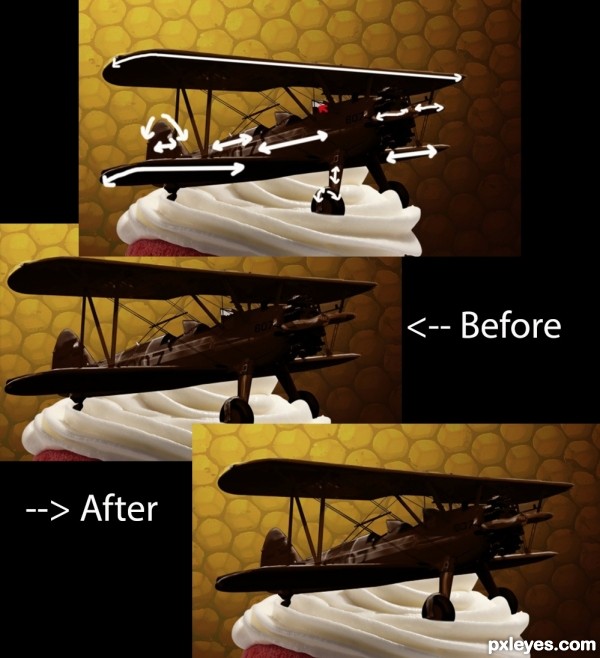
So, first, desaturate the airplane (remember, desaturation is the basic process to get the chocolate effect, so, never forget about it). (1st image)
Second,, charge the airplane selection pressing ctrl/cmd+click on the thumbnail of the airplane layer, then create a new empty layer above it and select it, and with the selection charged let's fill it with a dark brown, I used this one #331603, deselect by pressing ctrl/cmd+ D, and set this layer to overlay. (2nd image)
Third, merge the two layers by pressing ctrl/cmd+E, then, easily paint on the white numbers with the same color you used for coloring the plane, don't worry if it don't looks perfect now, the smudge tool will soon solve the inconvenient. (3rd image)
Step 7
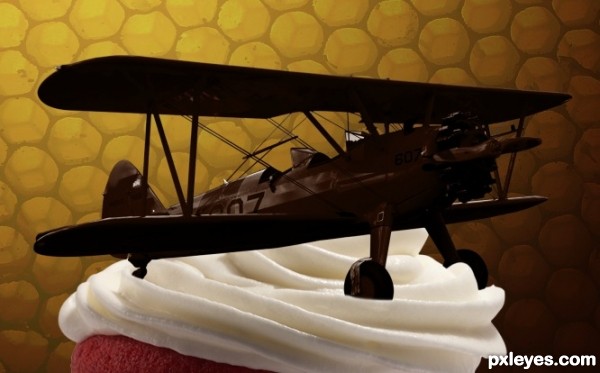
Set the plane carefully on top of the cupcake, add a layer mask to it and paint with a very small, soft, black brush on the mask to hide the wheels, which should be behind the ice cream's dunes.
Step 8
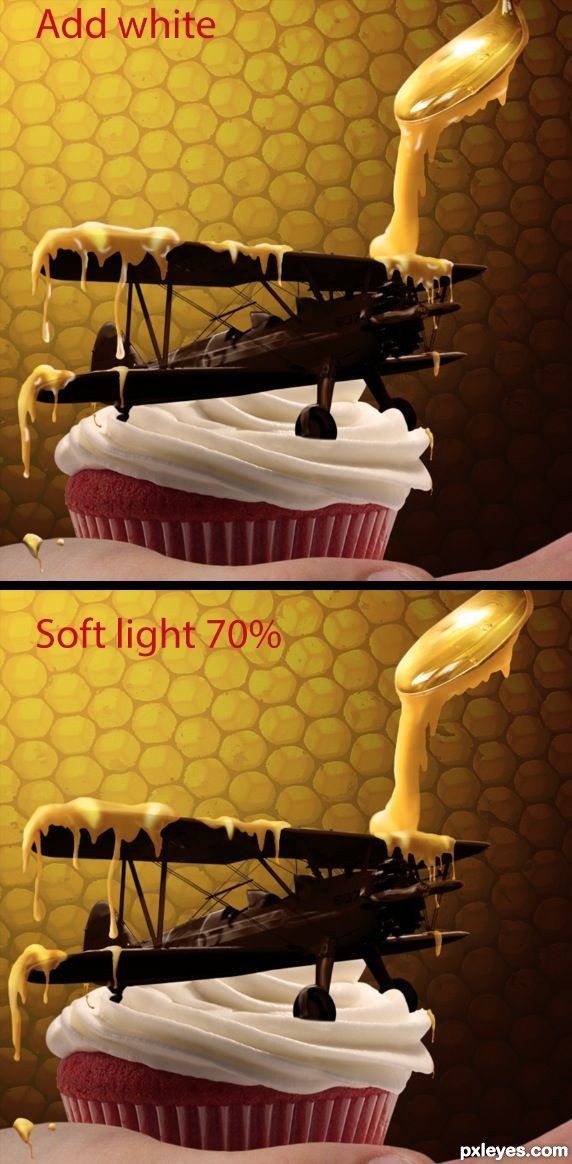
Create a new layer on top of the airplane and name it whites, use a tiny, soft, white brush and paint on the places where, in your opinion, the light would be more bright, in this case the upper part, try to follow the lines of the airplane while drawing. Then, when you think you have it done, change the blending mode to soft light, and reduce the opacity to 82%.
Step 9
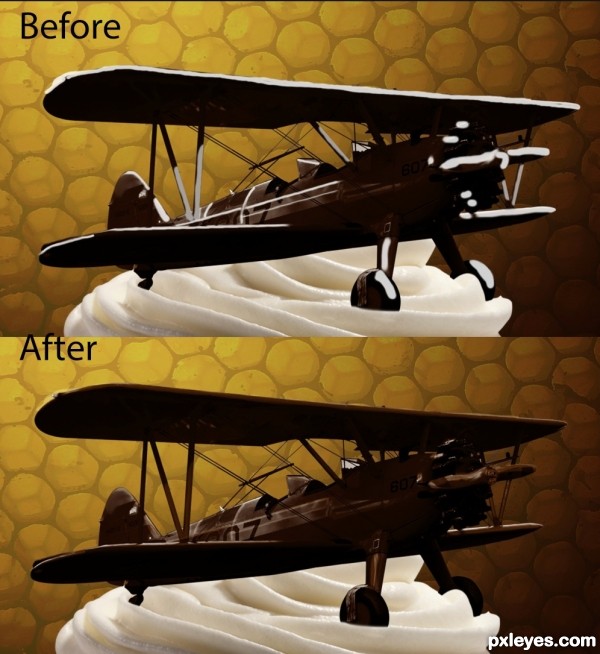
Now that you got a chocolate looking airplane, all you need to do is to make it real even more. A very important thing to do now, is softening the inner sharpen edges of the airplane. To get the effect, I used the smudge tool, 50% strength, all along the white lines, as showed by the underneath picture, watch out not to pass it over the thin bars (if you chose to leave them), or you will risk to destroy the image; therefore, in order to prevent it, every time you think you spoiled the image a little, get back and try to be more precise.
Do the same smudging process to the white lines we made in the previous step, I used a smaller brush for these.
Hence, once you have done with smudging here and there, it's time to cover the windshield with chocolate as well, and to do so, why don't you use the smudge tool again? To make a clear work and stay within the edges, charge the airplane selection and use the smudge tool in the direction shown by the red arrow in the picture beneath.
Finally, unless you already did it by your own, add to the "white lines" layer a clipping mask (press alt-click between the two layers, or right click on the white lines layer, and click on--->create clipping mask), adding a clipping mask, all the white smears outside the airplane borders will be hidden.
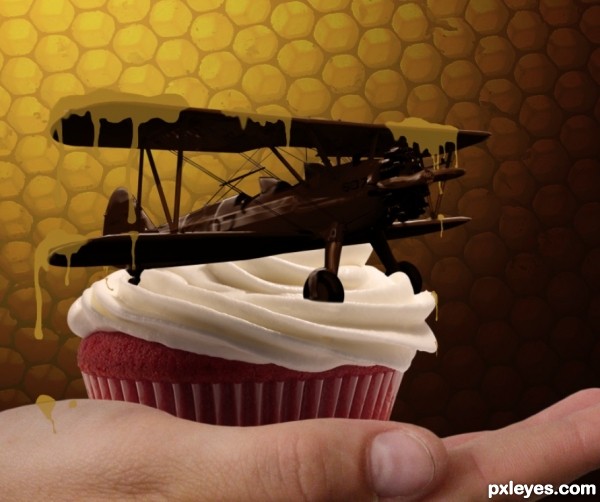
And the chocolate airplane is now done.
Note that in this situation, smudging the airplane has been an easy process, but most of the times it is harder, so, before to start smudging, it's better to be wise and create a copy of the subject that you are going to modify. Thanx to the copy you made, you got the chance to get back any time you want, and start it all over again.
Step 10
THE SPONGE
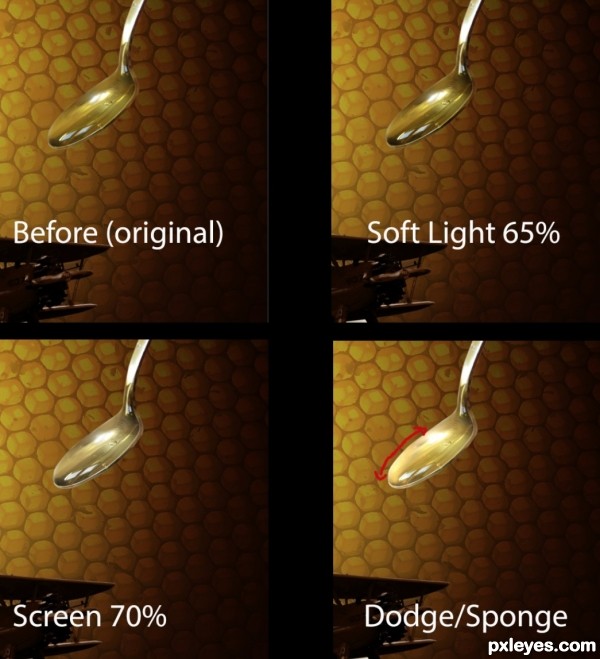
Make a selection of the sponge, but do not include the dripping honey.
Now you have a tea spoon with some honey over it, and you need to clear it away. I used a simple technique to reach the goal, I made a couple of copies of the original spoon, desaturate both, and set the first one to soft light 65% opacity, to give more contrast to the spoon, especially around the borders; hence, I set the second copy to screen mode at 70% opacity, which gave me the illusion of an empty spoon.
It is simply an illusion, but you are aware of the presence of some yellow honey on the tea spoon; therefore, merge the three layers together, create a copy of it (to stay safe from errors), and begin to saturate it and also make it brighter.
To make it brighter, use the dodge tool on the upper border as shown by the red arrow in the image below; firstly, select a soft brush, 0% hardness, set dodge to mid-tones, and exposure to 45%, then start to paint carefully over it. Secondly, set the exposure to highlights 35% and pass it over the points you think the honey should be brighter, but be careful when working on highlights, you can easily whiten it too much.
On the last step, use the sponge tool all over the spoon, set it to saturate, 50% flow or less, and start passing over the honey until you get a good result, but don't exceed with saturation, because now it's time to choose the definitive and personal color for your honey.
Step 11
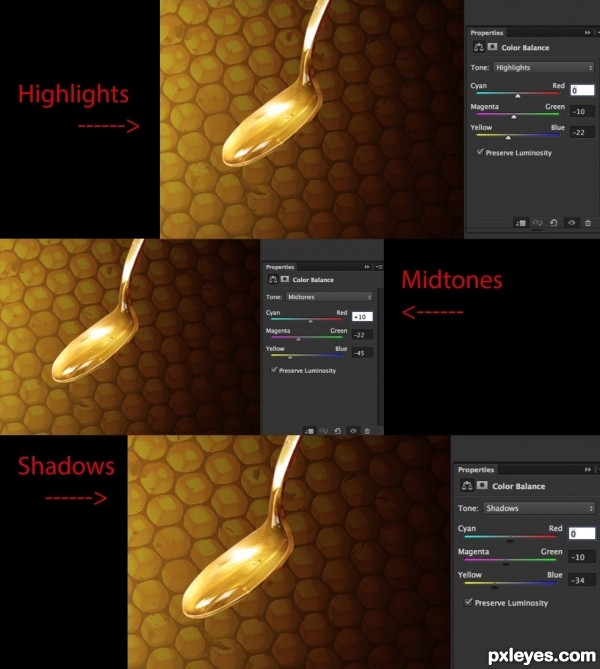
So, from the adjustment palette, choose "color balance", set it on top of the spoon and add a clipping mask to it. Now it's up to you to choose the main color for your honey to be; for example, I chose to make it more yellow predominant with a soft orange as second color. The settings to reach the effect for this tutorial are shown on the image below, but how I already said, you are free to adjust it in any way you want, (i.e. you can also transform it in a strawberry jam, or in some disgusting medical green syrup, etc...)
And now the easier part of the job is done, now is time to show a little of creativity.
Step 12
THE HONEY
I used the "lazo tool" to generate the honey shapes, try to imagine how would you the honey to appear for your picture and try to be creative as much as you can, long or short drips, thicker or liquid fluid, falling drops, drips connecting two different flows, etc...
Mind to click the "add to selection" button on the lazo options before start drawing the second one, and keep on drawing honey shapes wherever you like it most, do it until you get the result you mostly wish.
Don't worry if the result doesn't satisfy you at first, the liquify tool will do the rest later.
Note that, for the making of this tutorial I decided to separate the honey on the airplane from the big drip falling from the spoon, I made a great mistake, so it's better for you to draw it all at once.
Hence, when you suppose to have all the selection needed, select the brush tool from the palette, or press "b" to make it faster; then, hold the "alt" button and click on the honey on the spoon, move the cursor over it and choose the color variation you mostly like for your honey to be; then, now that the color you choose has been set as the foreground color, click on edit-fill-foreground color, and here you have it.
In order to evoke the honey transparency, add a layer mask on it, and paint with a low opacity black brush on the areas you want to be more transparent. Here again, you are free to imagine it in any way you want.
Step 13
Here is the result, note that I choose to totally remove some drips in front of the helix, I did it in order to give the sensation that they are falling behind the airplane propeller.
Step 14
Now, if you wish, you can use the liquify filter to deform, stretch, swell, and etc, the honey you created. Always mind to work on a copy when acting with destructive tools.
Then it's time to give the honey a 3D shape, and the following list shows the various tools you'll need from now on:
Dodge tool: mid-tones, 35% exposure / highlights, 12% exposure
Burn tool: mid-tones, 35% exposure / shadows, 8% exposure
Spoon tool: set it to saturate 45% flow
Smudge tool: 50% strengt
Before to act the following process, I suggest to work on a copy of the honey, and to work within it's borders, so charge the selection of the "honey copy" layer in order to prevent future troubles. A lot of accuracy is needed now, and it won't be easy to turn back on your steps.
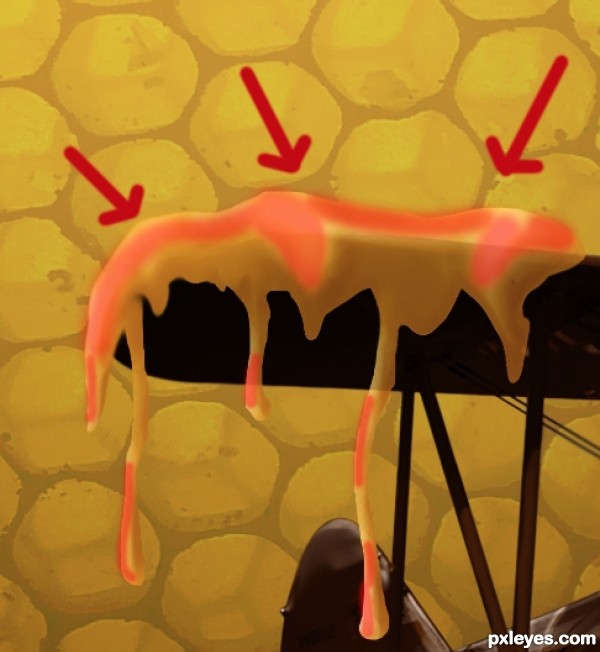
Let's start with increasing lights and saturation to the flat looking honey. So, as the lights are projected to the hand, the airplane, the spoon, and the cupcake, which suggests that the main light source comes from above, more precisely from the upper left side of the image; so, now let's think on where will the light hit our honey first. Once you find the right place to apply the dodge tool, set it to mid-tones, 35% exposure (remember that all the exposures are indicated at the beginning of this step) and start painting horizontally and vertically. As shown in the image below, the upper part of the honey needs to be more bright, because of the direct light hitting it. The red part shows the spots where I used the dodge tool.
Use the dodge set to highlights and draw vertical curves on top and some on the drips end, but remember not to exceed, the final retouches will be made as soon as the 3D effect would be done.
Finally, use the smudge tool to draw it over the areas you have now dodged, following the same directions of your previous strokes.
Step 15
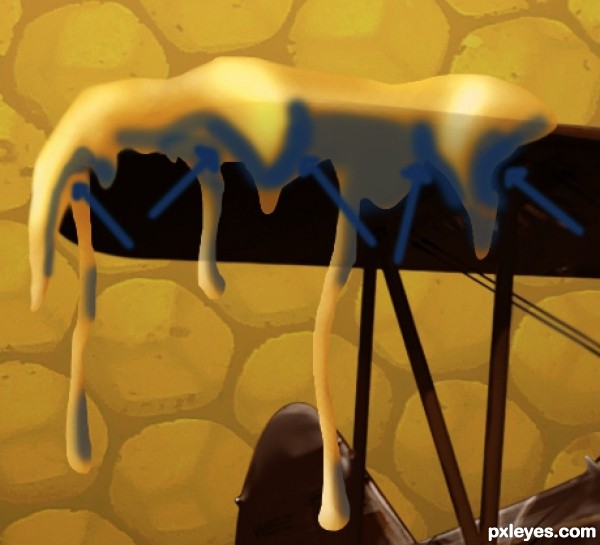
Now that the lights are quite ok, let's add some dark areas to the honey.
The process is identical to the previous, but this time, you need to use the "burn tool" to darken the mid-tones and add some deeper shadows to it.
As shown in blue in the image below, some areas need to be more darker than others (I used a transparency effect in the image below to show it, filled blue areas ---> darken / blue transparent areas ---> less darker). I suggest to by drawing the mid tones once all over the honey (obviously not over the places you had brighten before), then to draw it twice close to the vertical dodged curves, and finally, burn little and soft shadows under the bigger drips.
In conclusion, smudge the dark areas as you did to the dodged ones.
Step 16
This is the goal you should have reached at this point. And also the point where you can act the final retouches to it.
Note that I didn't show how I made the honey falling from the spoon, I used nothing but the same technique shown in the previous four steps.
Step 17
To give the sensation of motion to the honey, I drew some curved lines on a new layer above the honey, I chose a white color for it, but you are free to use whichever color you want, a bright or dark yellow, orange, brown, according to the sensation you want it to give to your honey.
So I'll explain the easy technique to blend it better.
Once you have drawn all the curves, and you think it's ok, pick up the smudge tool again, and softly stretch all the colored lines.
Then change the blending mode of the layer to soft light, and set its opacity to 58%.
Step 18
THE BUBBLES
Charge the bubbles brush, choose a white color in this instance, create a new layer, charge the honey selection again, and use 2 or 3 dimensions for your brush, click here and there on the whole honey. Then pick the eraser tool, 100% opacity, 25% harshness, to remove most of the bubbles within the honey. Is up to you on how many bubbles you want to leave on it.
I also used the smudge tool on the bubbles, but decrease the strength this time, about 20%, or the risk is to make them unrecognizable.
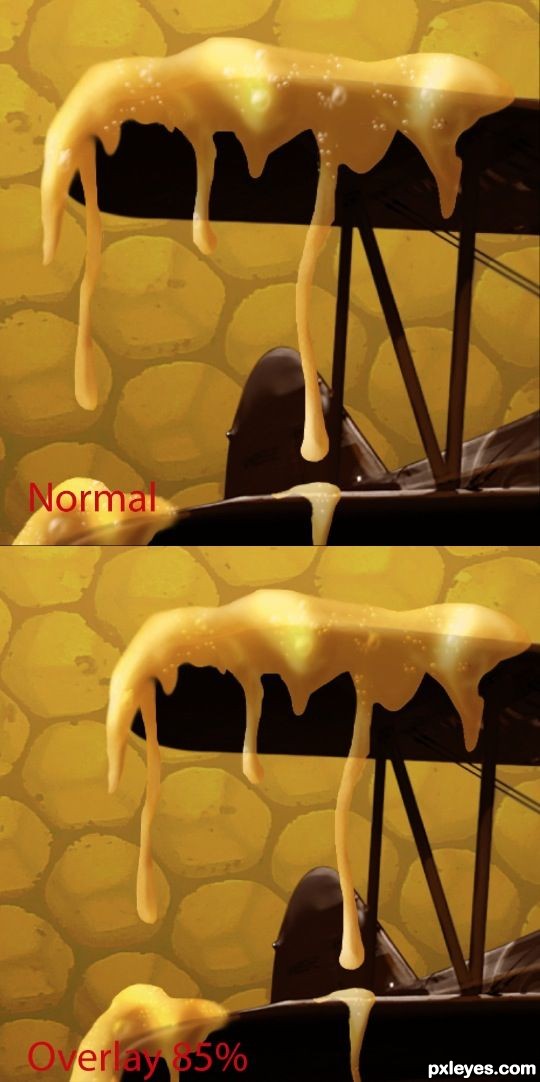
Hence, turn the layer to overlay and low it's opacity to 85%. You got the effect.
Step 19
SHADOWS
Because of the hard light coming from up, the shadows need to be fairly definite and dark. I used a soft brush to paint them all, for they were not so hard to manage.
To get a better result, shadows should be painted on the proper layer (i.e. in this situation it is the "hand" layer), with a brush set to multiply on the brush option menu, so you should reduce the opacity and start to drop shadows. Working this way, shadows would appear more natural, but it ends to be destructive to the "hand" layer.
Therefore, I opted for a no destructive way, I've added a new layer at soft light blending mode , and began to paint with a soft black brush with low opacity over the interested areas.
So the tip is to create a new layer for each element that needs a shadow; in this case the honey drips over the hand. As you can see, the shadows should be underneath the drips; hence, place the new layer under the honey one, and start to paint around the drip's borders with a small brush at 32% opacity; then, enlarge the brush size a little and decrease the opacity to 18% or lower, and pass it once again on the same areas. This last passage gives the impression of a fading shadow .
Step 20
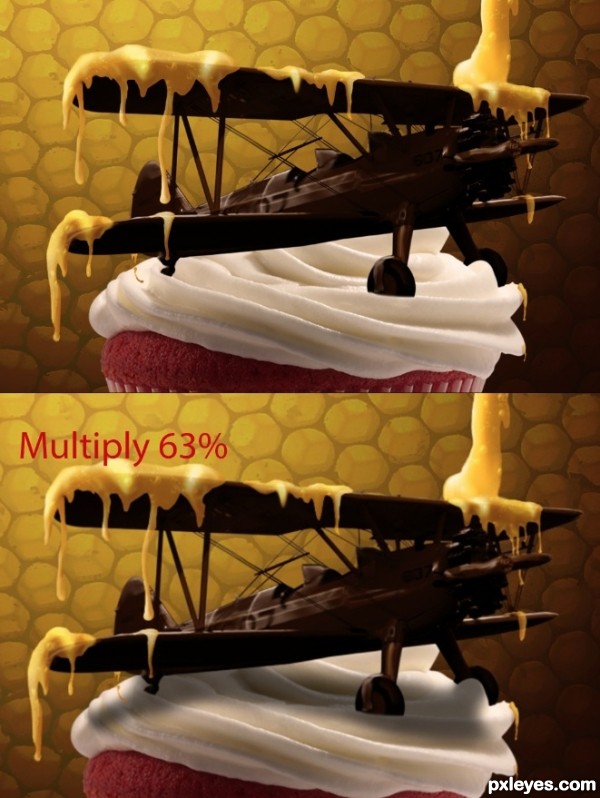
Repeat the previous step under the airplane layer, but this time use multiply as blending mode (because of the white ice cream below the airplane); then, low the layer opacity to 63%.
Step 21
Different are the shadows for the cupcake and the hand, it is because the shadows we need to evoke are upon the image, and not below. Surely the cupcake projects a shadow on the hand, so you can act just like you did before, or choose to darken the hand later (which has been my final choice).
Let's focus on the cupcake now; so, create a new layer but this time set it above the cupcake; then, apply a clipping mask to it and repeat the same process of shadowing -I used a couple of layers to get the definitive effect-.
Step 22
Do the same for the hand, I've also added some dark yellows on the palm, some red under the cupcake, and some dark brown under the fingers to blend it better with the background.
To make it pop much more, add on top of the layers a warm photo filter from the adjustment palette , increase the density to 30% and the work is done.
And here we are at the end of this tutorial, remember that the honey technique I shown can be used for several purposes, which are: jam, blood, syrup, honey, and whichever existing liquid or semi-liquid material.
This has been my very first time with chocolate and honey, and I'm sure it can be improved to be more realistic; so, as soon as I'll be aware of it, I would probably write a new tutorial explaining how to get the top! :)
Hope you enjoyed it.
Goodbye.
Step 23
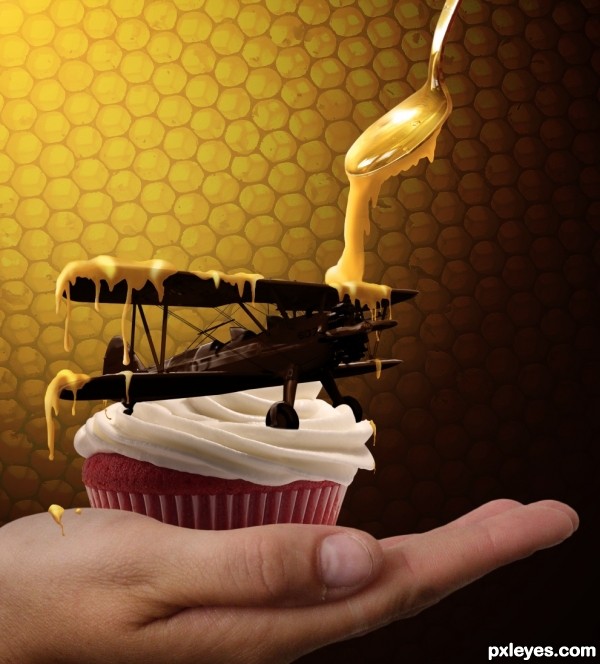
The end result
Hope you can learn something new from this tutorial.
I feel really glad if you give me feedback through comment below. Soon i am going to show more interesting & innovative tutorials so please keep visit our blog. That’s for now.
Have fun!
Feel free to contact with Clipping Design for clipping path service, image editing service, image masking service or any kind of design support.
Thank you… 
Credit: pxleyes.com
No comments:
Post a Comment