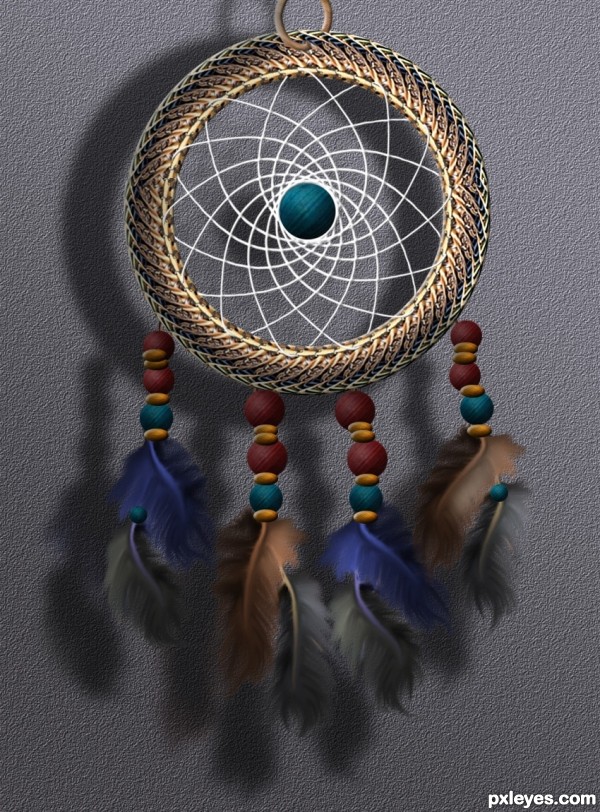
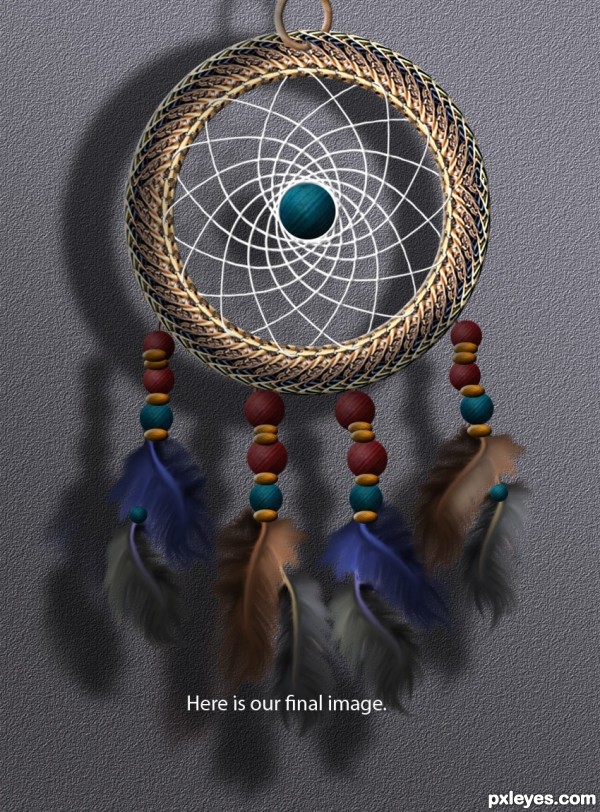
In today's tutorial we will show how to make a Colorful Native American Dream catcher in Photoshop. We use to create this tutorial amazing texture and Photoshop technique. So let's see
Step 1
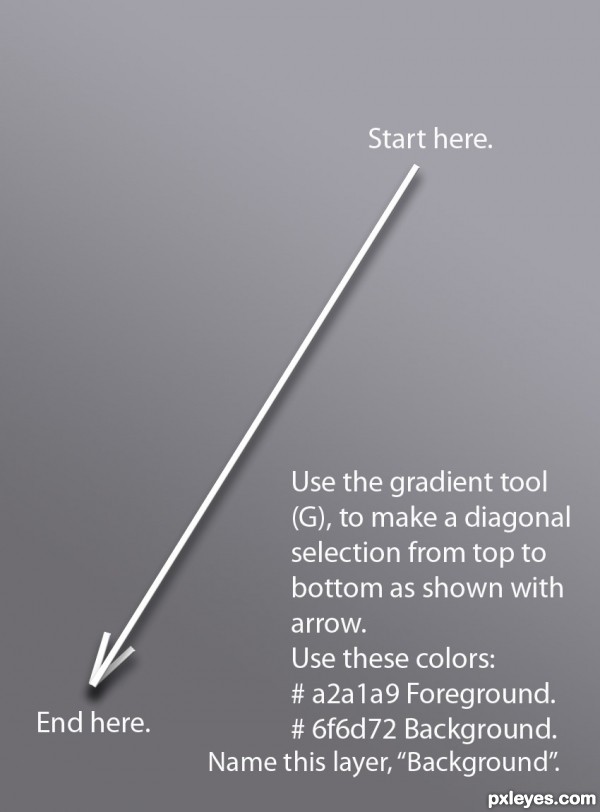
Open a new document 850 X 1150 px.
Use the Gradient tool (G), to make a diagonal line as shown in image.
Use the following colors:
Foreground: # a2a1a9.
Background: # 6f6d72.
Step 2
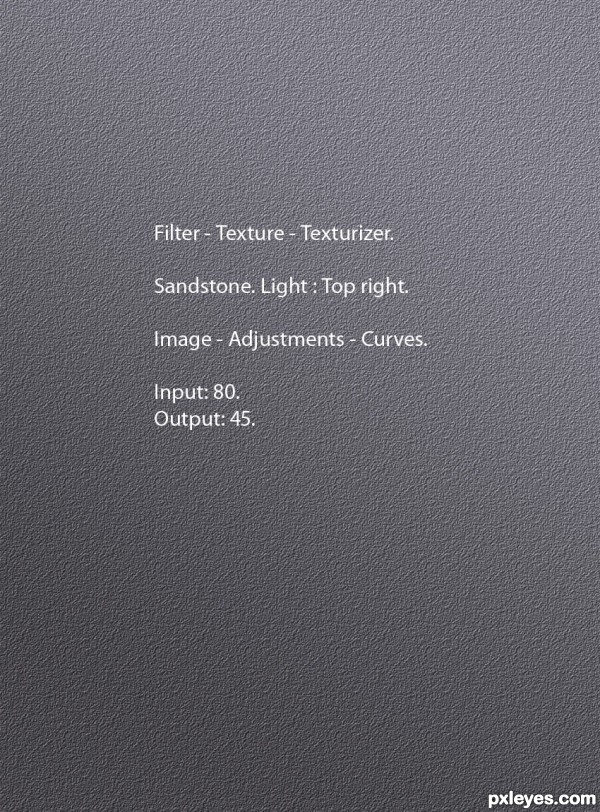
Filter - Texture - Texturizer.
Sandstone. Light: Top right.
Image Adjustments - Curves.
Input: 80.
Output: 45.
Step 3
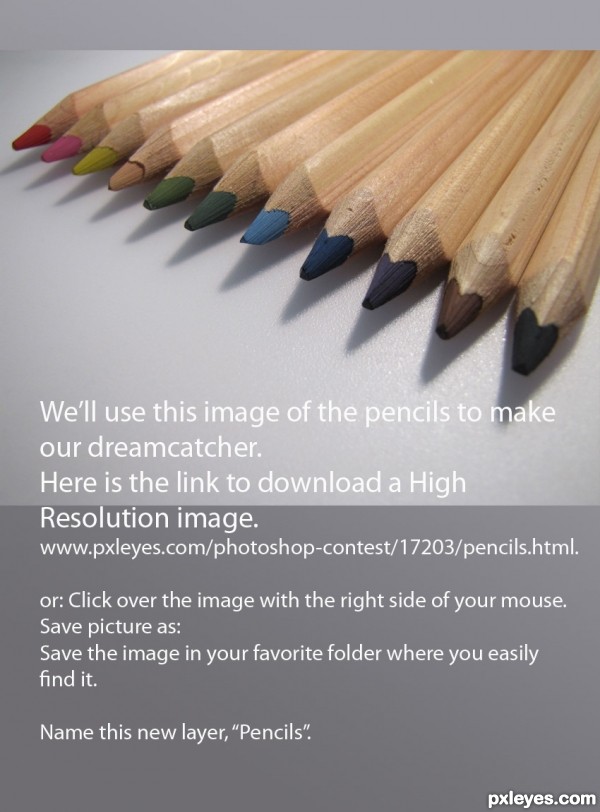
This picture of the pencils was provided by pxleyes for a contest. Here is the link to download the original high resolution image.
www.pxleyes.com/photoshop-contest/17203/pencils.html.
Or: Click over the image with the right side of your mouse.
Save picture / image as.
Save the image in your favorite folder where you can easily find it.
Step 4
We'll be working on a black background.
Click over the eye, located to the left side of layer "Background" to make it inactive.
Open a new layer and fill it with black color. Name this layer, "Black", this layer will be deleted later.
Step 5
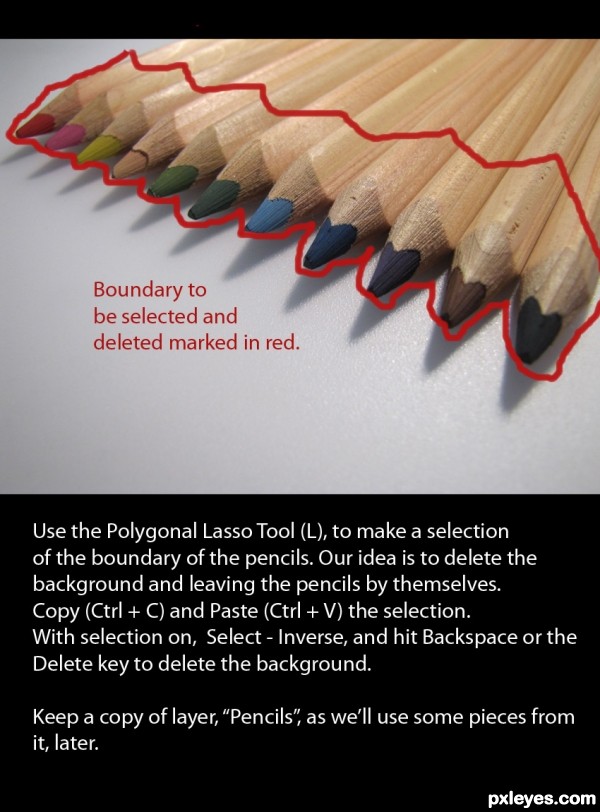
We'll delete the background we do not need. We want to use part of the pencils. I show an edged line in red surrounding the pencils.
Use the Polygonal Lasso Tool (L), to make a selection of the pencils. The red edged line, shows the way you have to make the selection. A kind of zig - zag line.
Copy (Ctrl + C) and Paste (Ctrl + V) the selection. With selection on, go to Select - Inverse, and hit the backspace or delete key to delete the background, and leave the pencils by themselves. Keep the name for this layer, "Pencils".
Keep a copy of the original layer, "Pencils", not this copied and pasted selection. We will use parts of this layer later.
Step 6
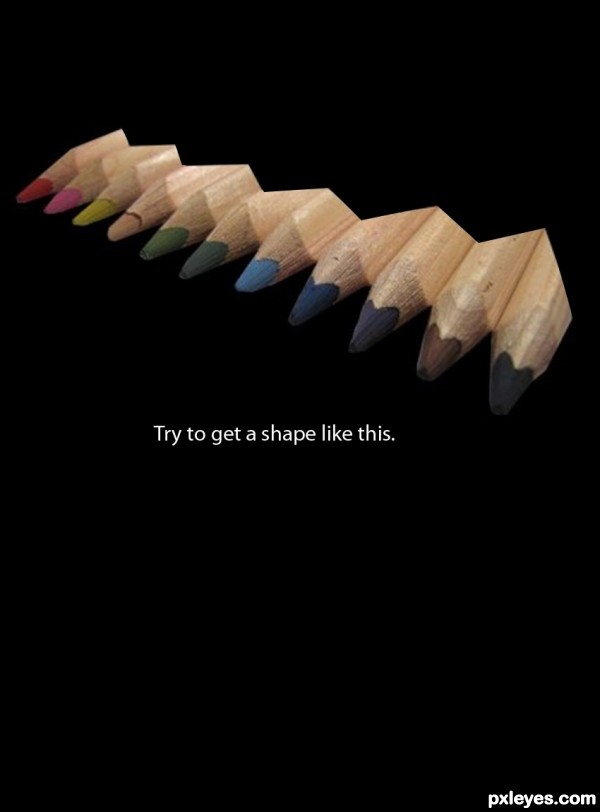
Try to get a shape like this.
Step 7
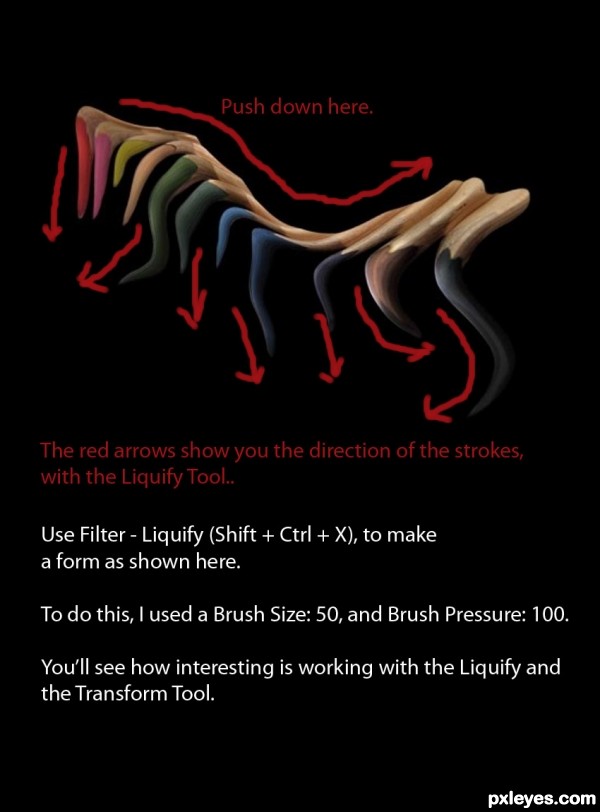
Use Filter - Liquify - Warp (Ctrl + Shift + X), to make a form like shown in image.
Use a brush size 50, pressure of 100.
Follow the red arrows to make the warping and liquifying.
You will see how interesting is working with the liquify and transform tools.
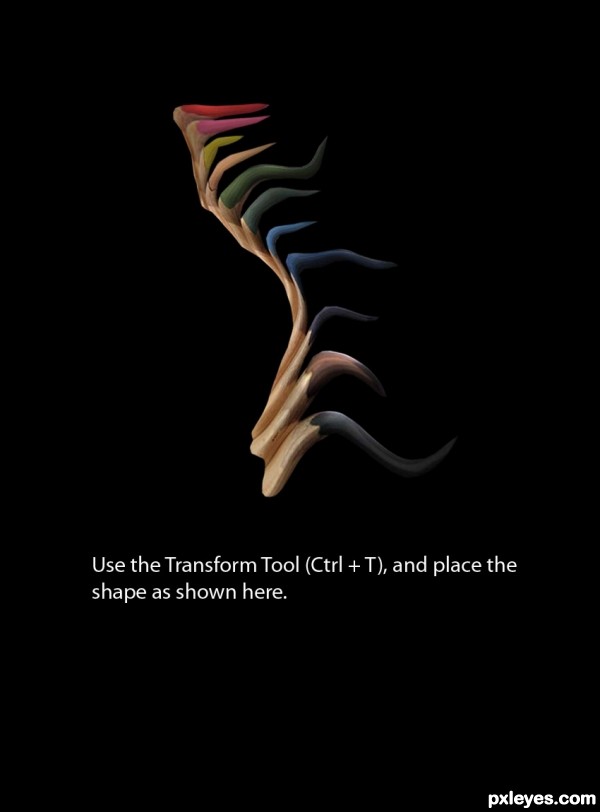
Step 8
Use the Transform Tool (Ctrl + T), and place the shape as shown in image.
Step 9
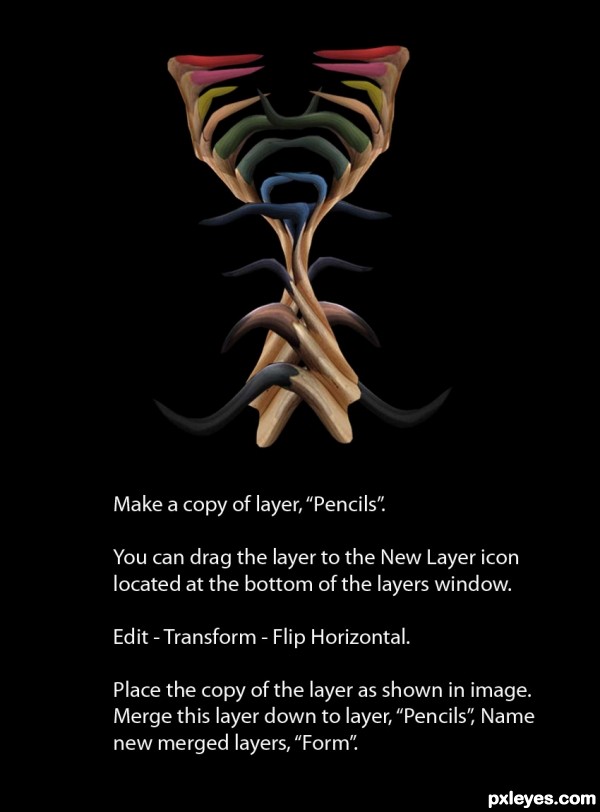
Make a copy of layer, "Pencils".
You can drag the layer, to the New Layer icon, located at the bottom of the Layers window.
Edit - Transform - Flip Horizontal.
Place the layers as shown in image. Merge this layer down to layer "Pencils", and name it, "Form".
Step 10
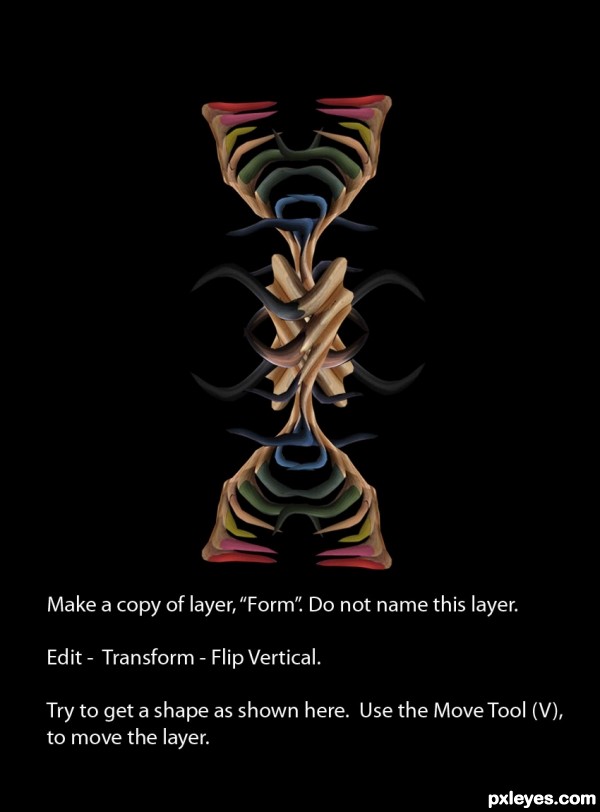
Make a copy of layer, "Form". Do not name this layer.
Edit - Transform - Flip Vertical.
Try to place the layers together as shown in image. To move the layer use the Move Tool (V).
Step 11
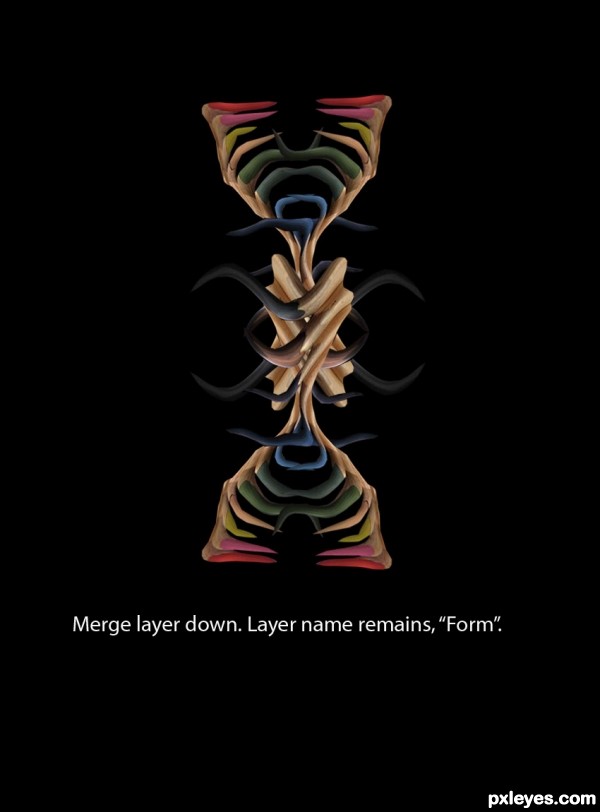
Merge layers down. Layer's name remains: "Form".
Step 12
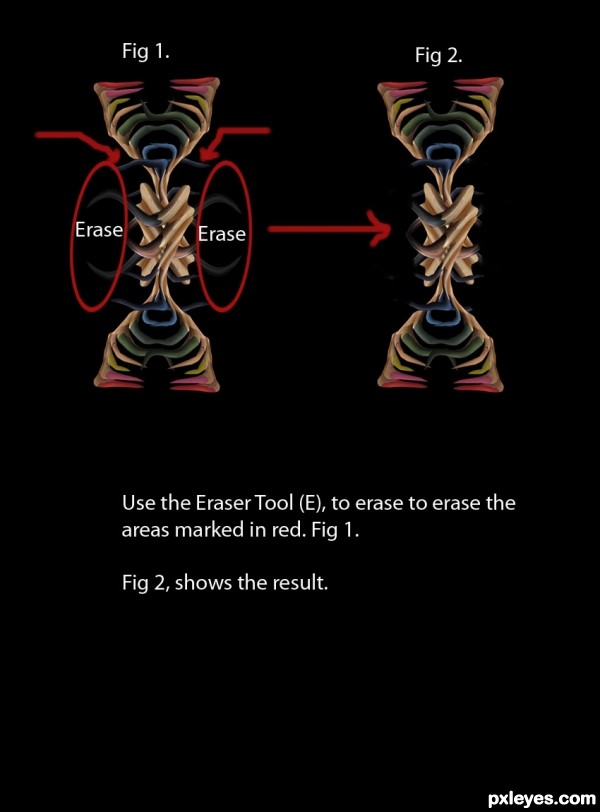
Use the Eraser Tool (E), to erase the spots marked in red. Fig. 1.
The result is shown in fig. 2.
Step 13
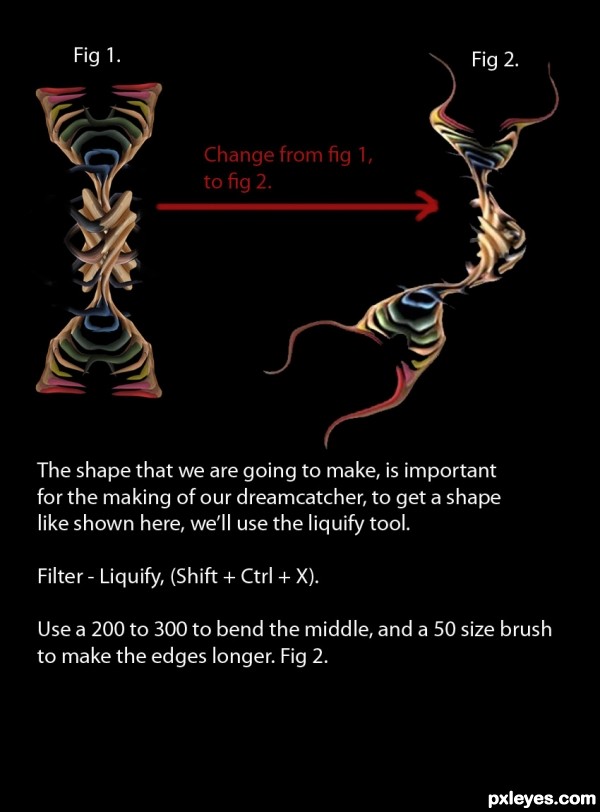
The shape we are going to make, IS VERY IMPORTANT, so, try to make it close to the shape shown in image. We'll use the Liquify - Warp Tools.
Filter - Liquify - Warp.
Use a 200 to 300 brush and a pressure of 100, to bend the middle of the shape.
Use a 50 brush size,to make the edges longer. Altough, our idea is to get the middle part of the shape nicely rotated, the edges, will be erased later.
Step 14
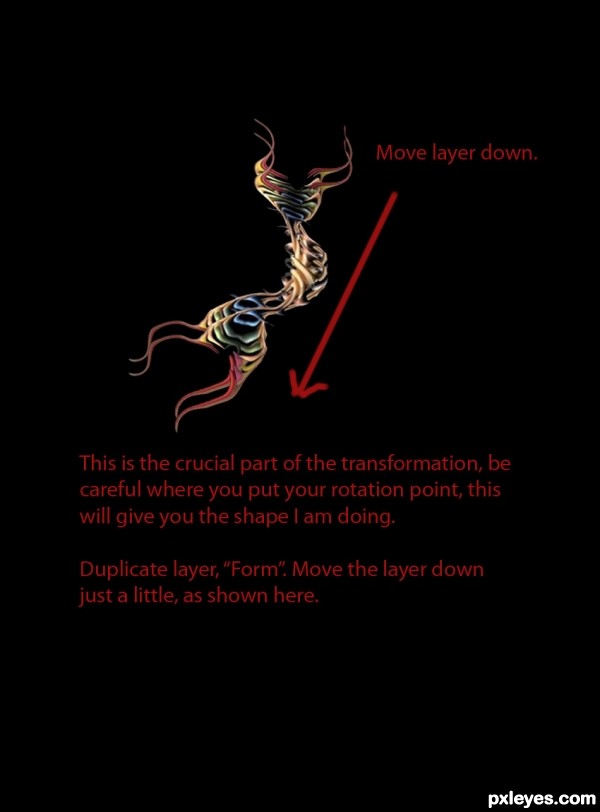
This is the CRUCIAL part of the transformation. In this step I will suggest you to be careful placing the rotating point, because at the end, your circular shape, can be outstanding, and I know you will do it right.FOLLOW THE NEXT STEP CAREFULLY!
Duplicate the layer, "Form", and move it just a little down as shown in image.
Step 15
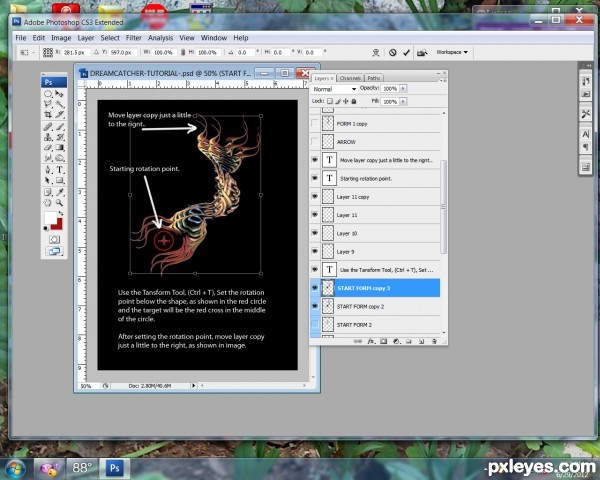
Look at the image, and place the rotation point right there, in the right place, and you'll be fine.
Use the Transform Tool (Ctrl + T), set the rotation point, just below the center as shown in image.
After setting the rotation point, move the shape a little to the right.
Step 16
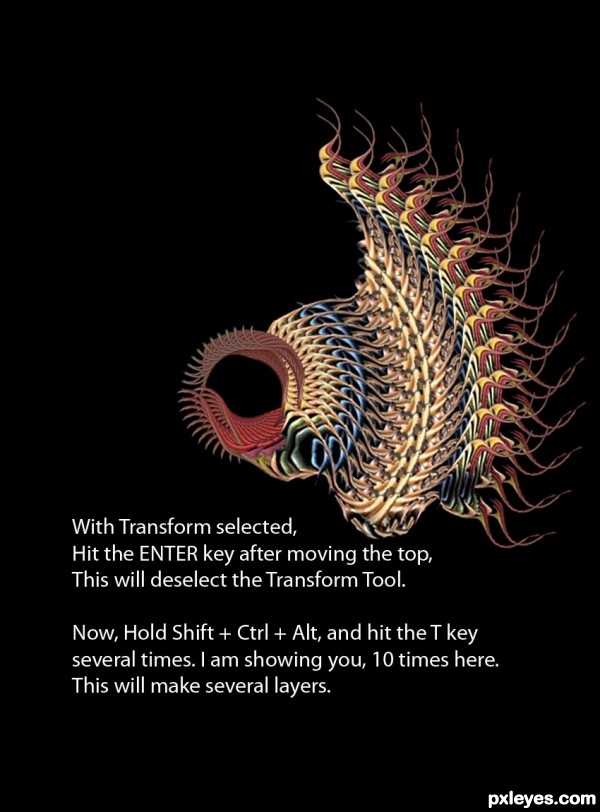
With the transform selected. Click ENTER to deselect.
Hold Shift + Ctrl + Alt, at the same time. Hit the (T) key several times, the image shows 10 times rotation, this will make several layers.
Step 17
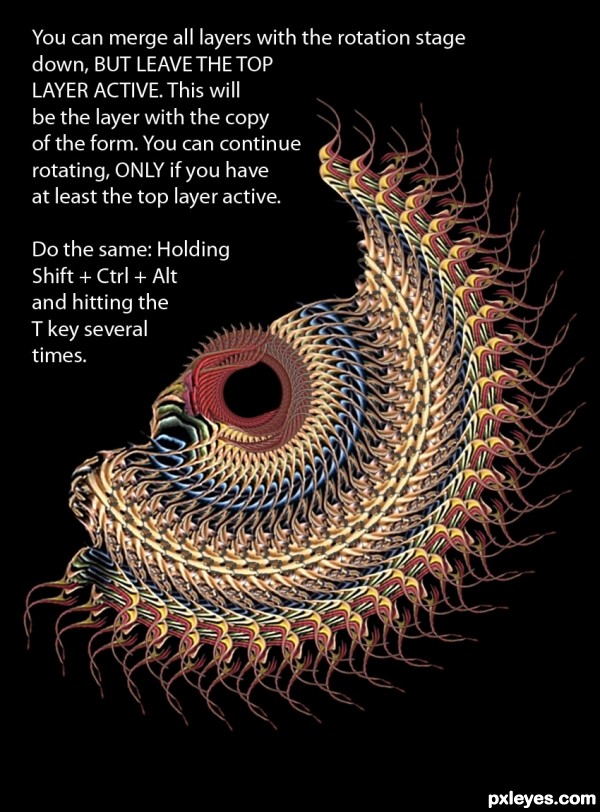
You can be merging layers as you do the rotation, BUT DO NOT MERGE THE TOP ACTIVE LAYER, the one that is at the top of the rotation. You can continue rotating, only if you have this last layer active.
Do the same, hold Shift + Ctrl + Alt, and hit letter (T) several more times.
Step 18
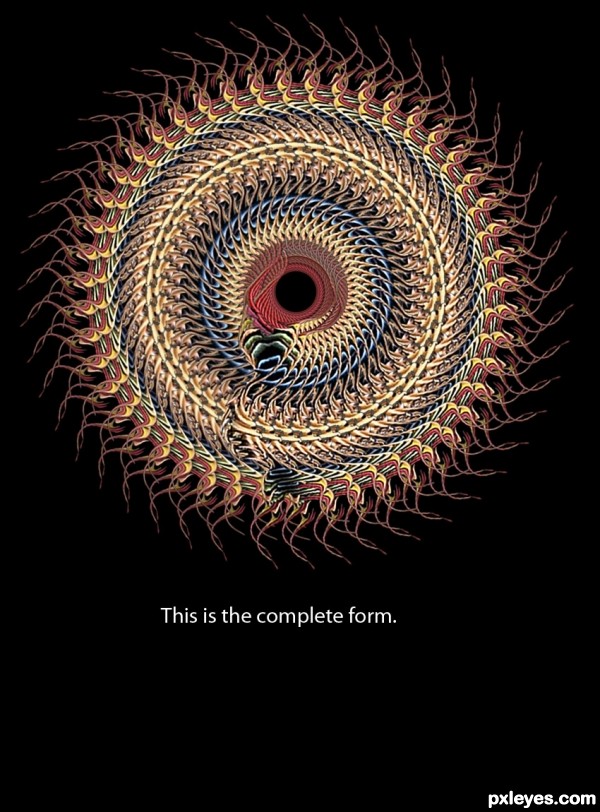
This is the complete form.
Step 19
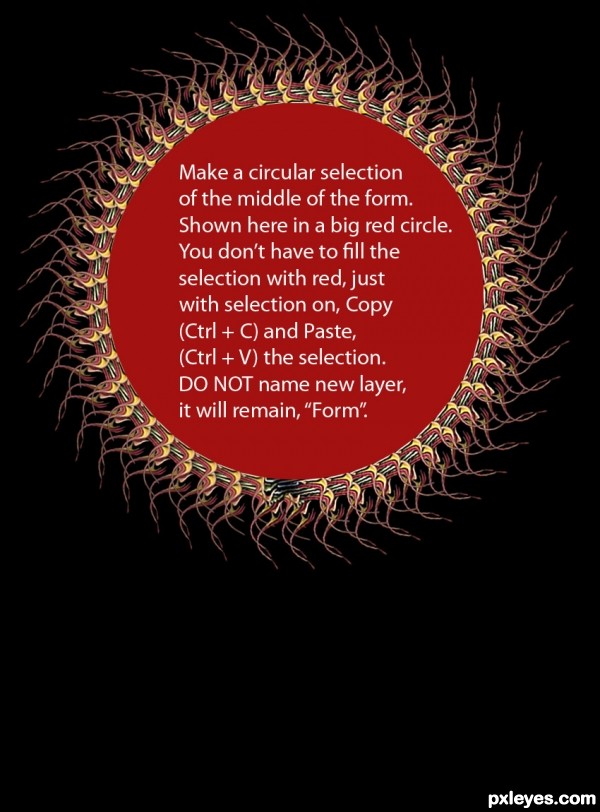
Make a selection of the middle of the form, shown in image in a red circle.
You do not have to fill the selection with red color.
Use the Elliptical Marquee Tool (M) . Hold Shift and drag the circle until you have a perfect selection of the area shown in red.
Copy (Ctrl + C) and Paste (Ctrl + V), the selection. Do not name new layer, it will remain "Form".
Step 20
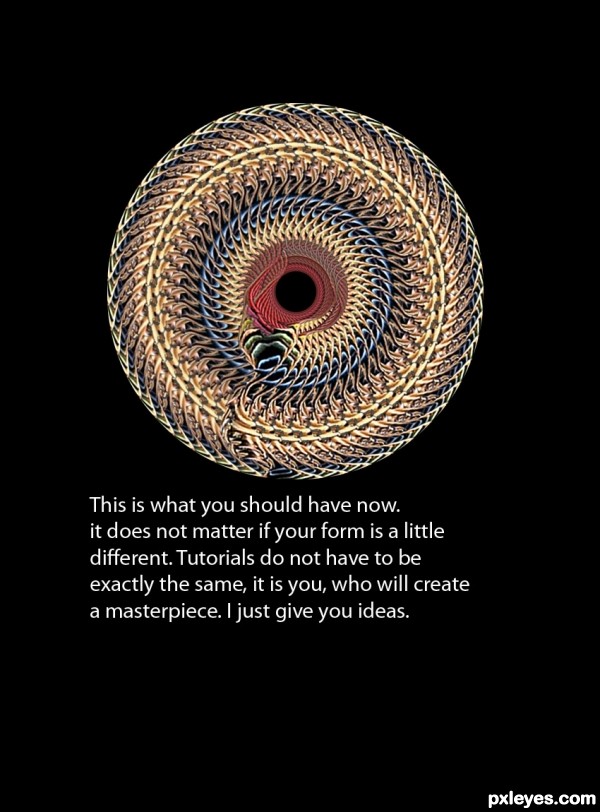
This is what your image should look. Try to get the image, as close as possible as the one shown in image.
Probably your image is going to look a little different. You are the artist and you will decide the right selection for your image to look nice. I am just giving you an idea.
Step 21
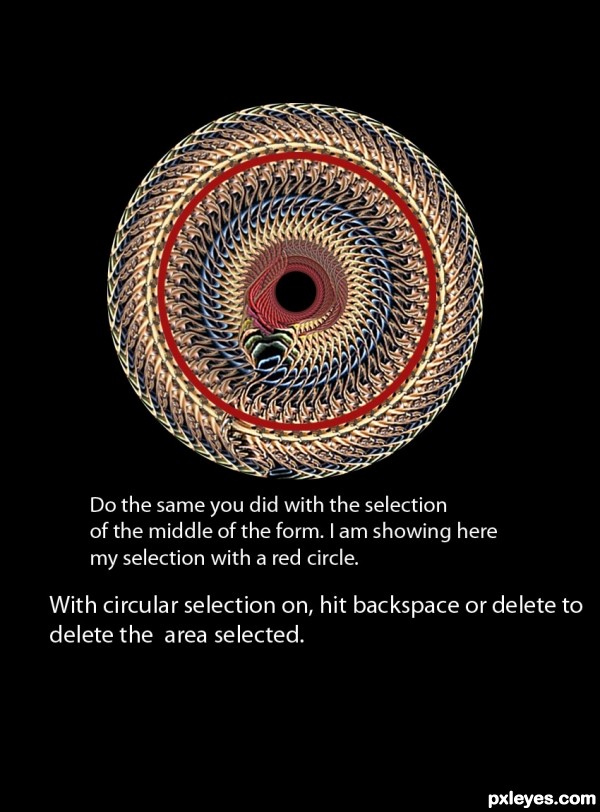
You'll make another selection of the middle of the form. I am showing you here, how I did it, in a red circle.
With circular selection active, click backspace or delete, to delete the middle part of the form.
Step 22
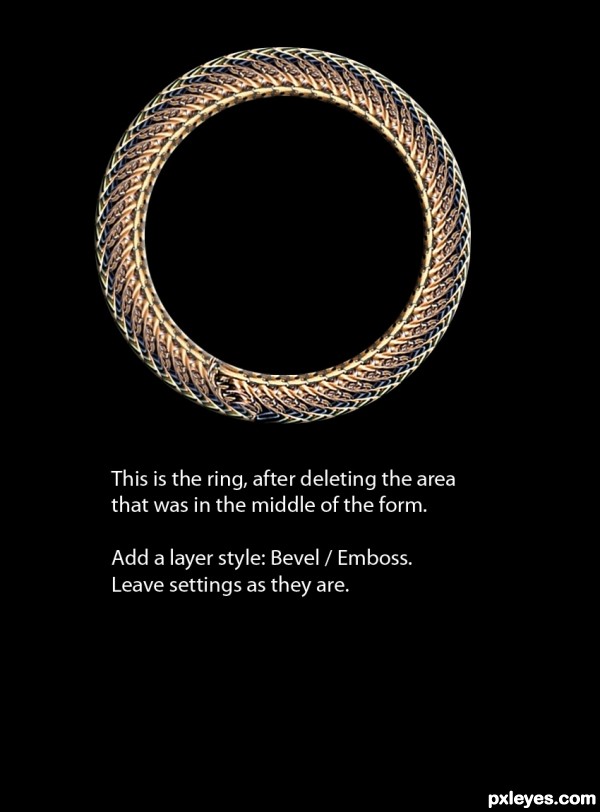
This is the ring, after deleting the middle part of the form.
Add a layer style to it:
Bevel / Emboss. Leave the settings as they are.
Step 23
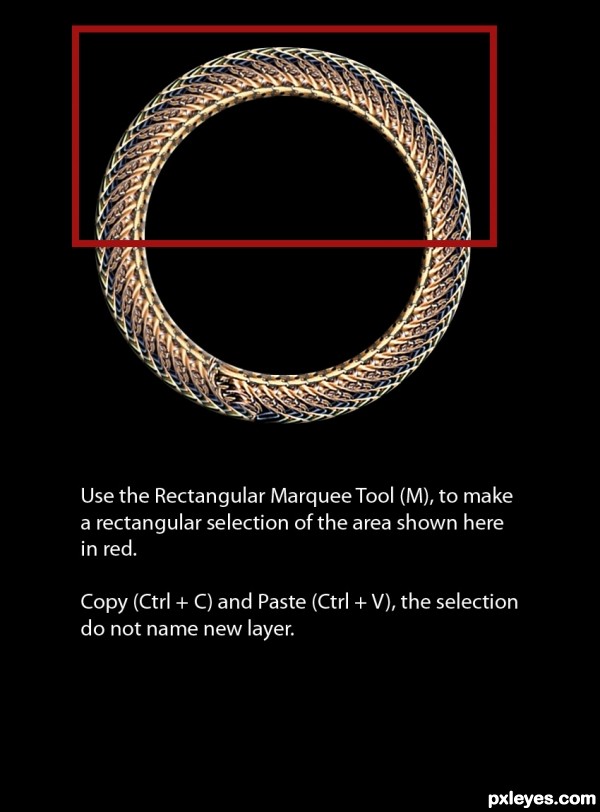
Use the Rectangular Marquee Tool (M), to make a rectangular selection of the area marked in red.
Copy (Ctrl + C), and Paste (Ctrl + V) the selection. Do not name new layer.
Step 24
Edit - Transform - Flip Vertical.
The idea of making a copy of the top of the ring, is to fix the area that is not similar to the rest of the ring.Red circle.
After doing this, all the ring will look the same.
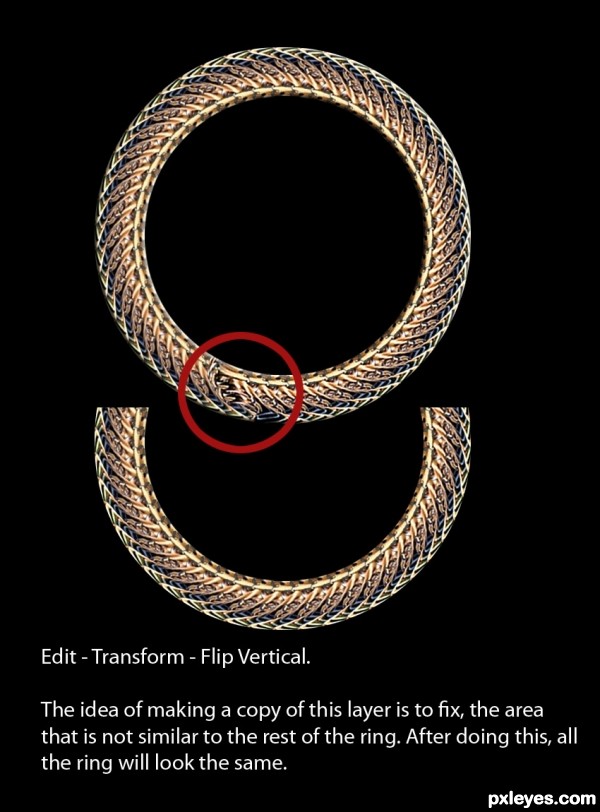
Step 25
Use the Move Tool (V).
Move the copy of this layer on top of layer, "Form".
You can change the name of the new layer, from layer, "Form", to layer, "Dreamcatcher".
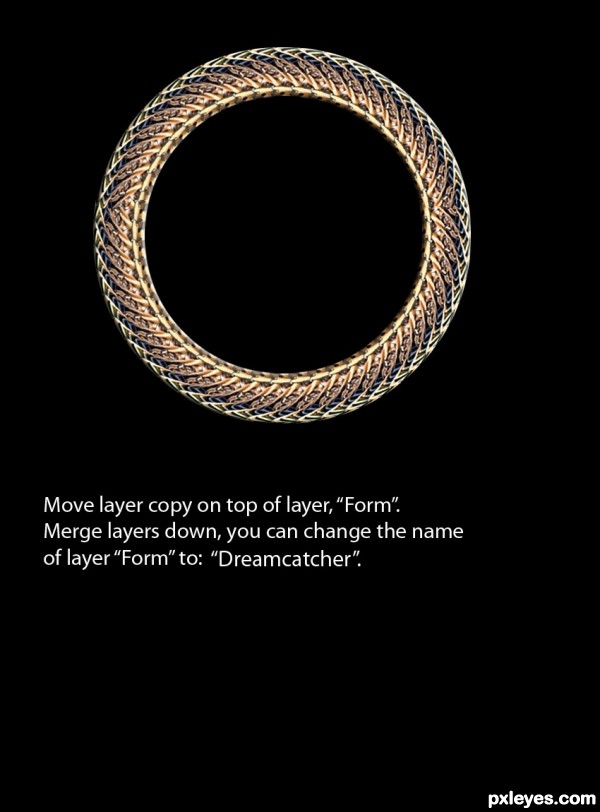
Step 26
Delete layer, "Black", and make layer, "Background" active. Just click over the eye, located on the left side of the layer, and it will make it active.
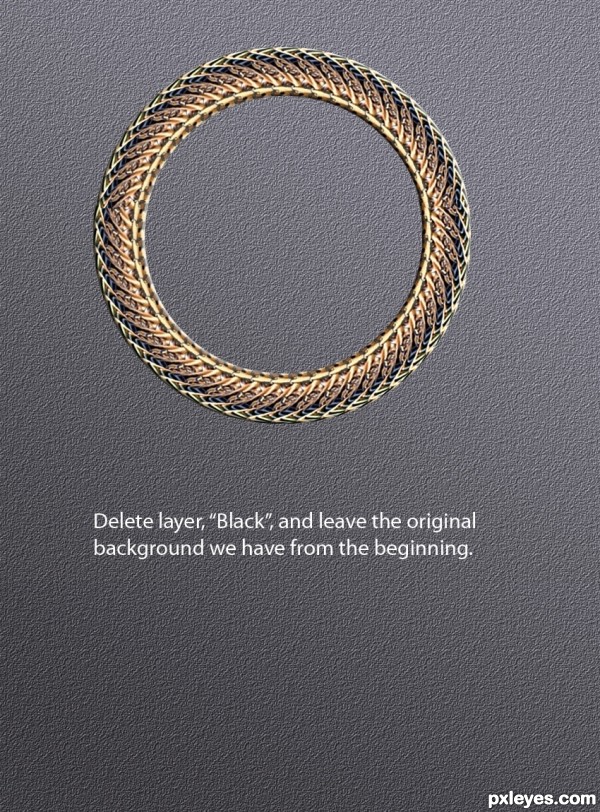
Step 27
To make the design for the net do the following:
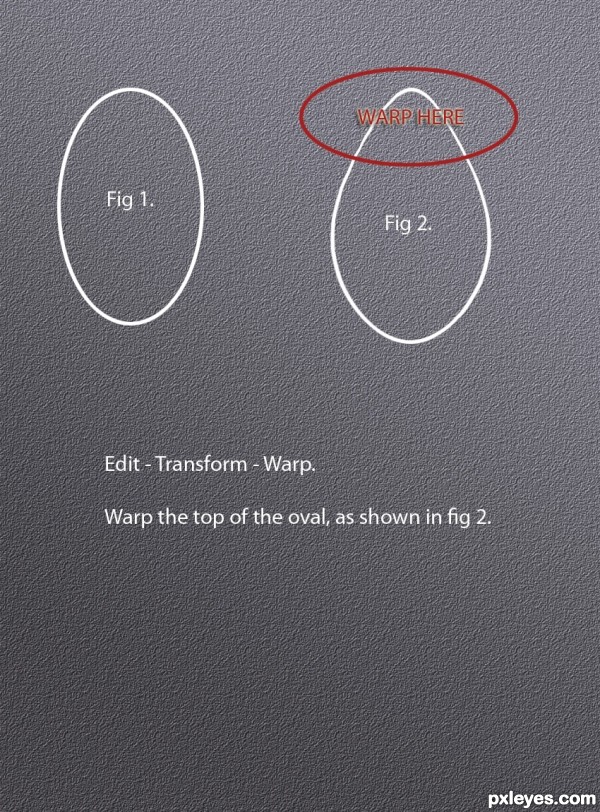
Use the Elliptical Marquee Tool (M), to make an oval selection. Fill the selection with white color. Name new layer, "Net". Fig. 1.
With selection on, go to Modify - Contract, and contract the selection by 5 px.
Click backspace or delete to delete the inside the oval, leaving a line drawing, instead of a fill. Fig. 2.
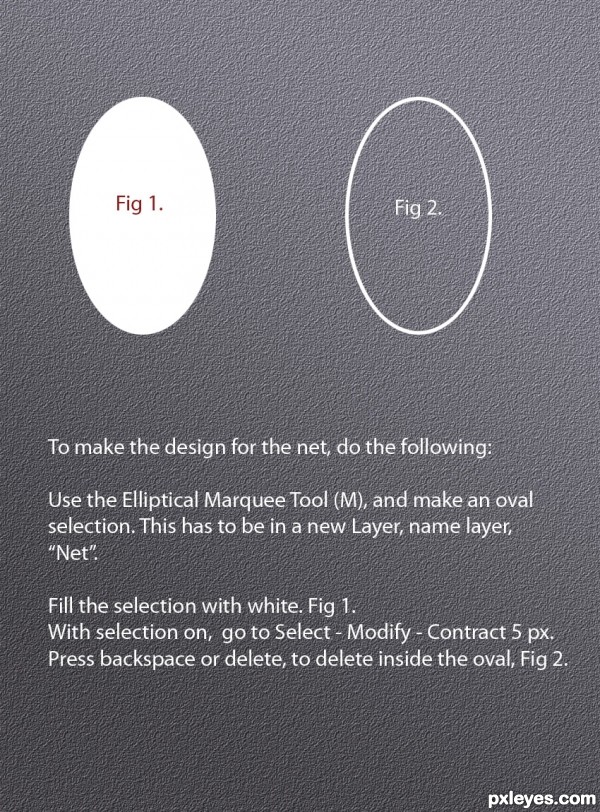
Step 28
Edit - Transform - Warp.
Warp the top of the oval, as shown in image. Fig. 2.
Step 29
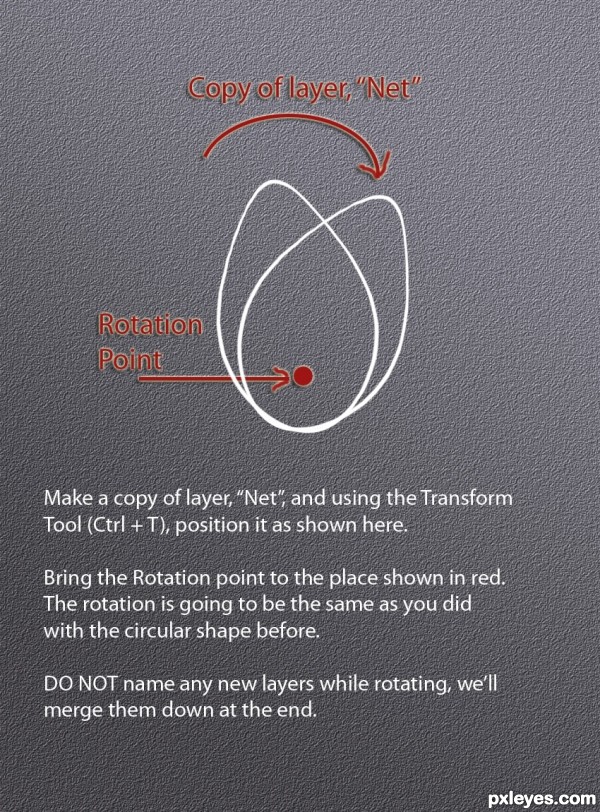
We'll use the Transform - Rotation Tool to make some rotations of the oval shape.
Make a copy of layer, "Net", and using the Transform Tool (Ctrl + T), position the rotation point as shown in image.
Bring the Rotation Point to the area shown here in red. The rotation will be the same as you did rotating the form. Well, not as colorful, but interesting!
DO NOT name any rotating copy layers, like Net copy 1, Net copy 2, etc.... We'll merge all of these layers at the end of the rotation.
Step 30
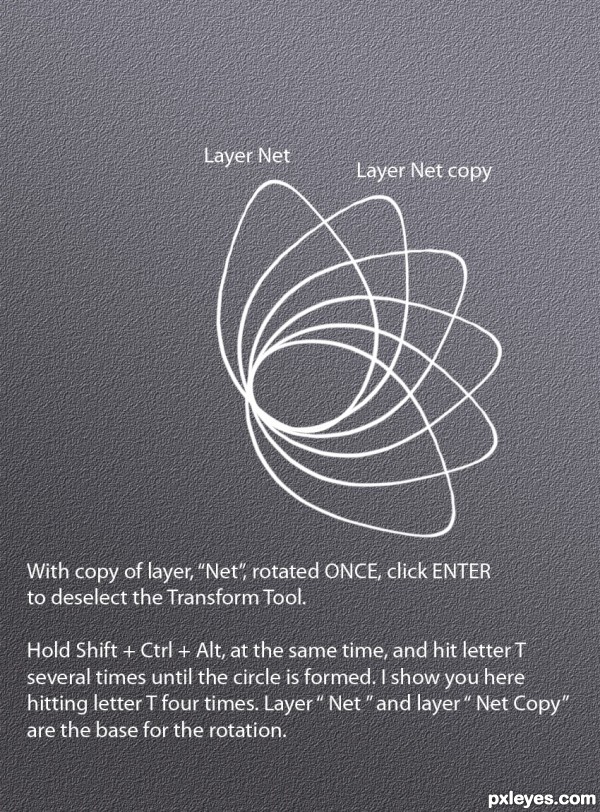
With copy of layer, "Net" rotated ONCE, click ENTER to deselect the Transform Tool.
Hold Shift + Ctrl + Alt at the same time, and click letter (T) to start the rotation.
Here in this image I am showing you, the white oval shape, rotated 4 times, not counting layer, "Net, and Net copy", as they are the base for the rotation. These rotations will open new layers as you go. Do not name any new layers.
Step 31
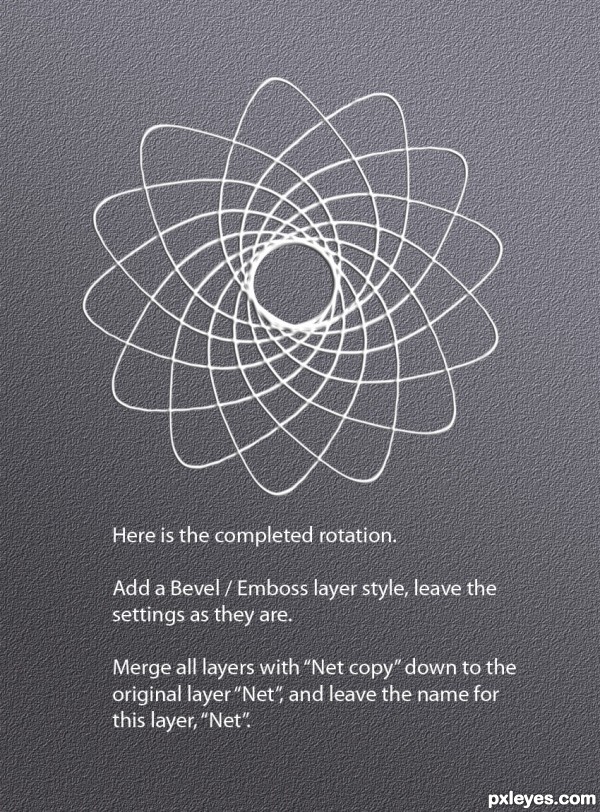
Here is the complete rotation.
Add a layer style to it. Bevel / Emboss. Leave the settings as they are.
Merge all the layers, with layer Net copy, down to layer, "Net", and leave the name for this layer, "Net".
Step 32
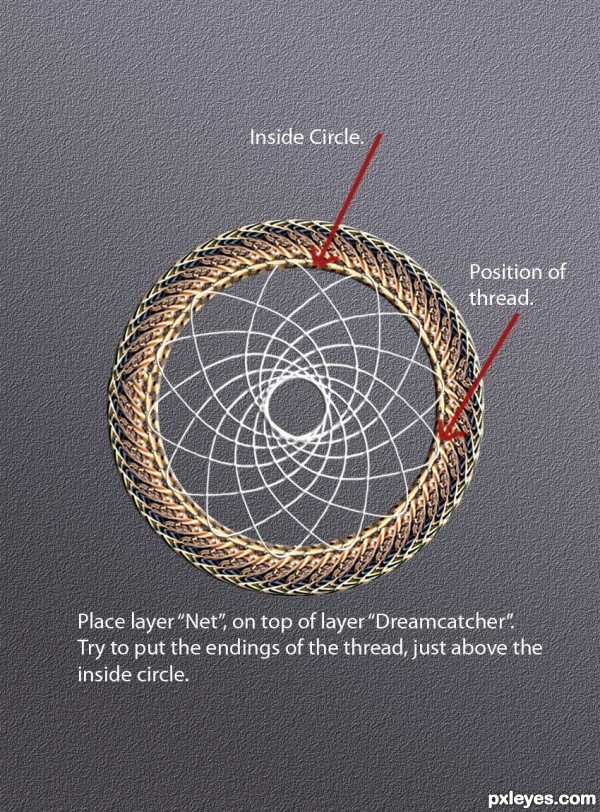
Place layer, "Net" on top of layer, "Dreamcatcher".
Try to put the endings of the thread or net, just above the inside circle, as shown in image.
Step 33
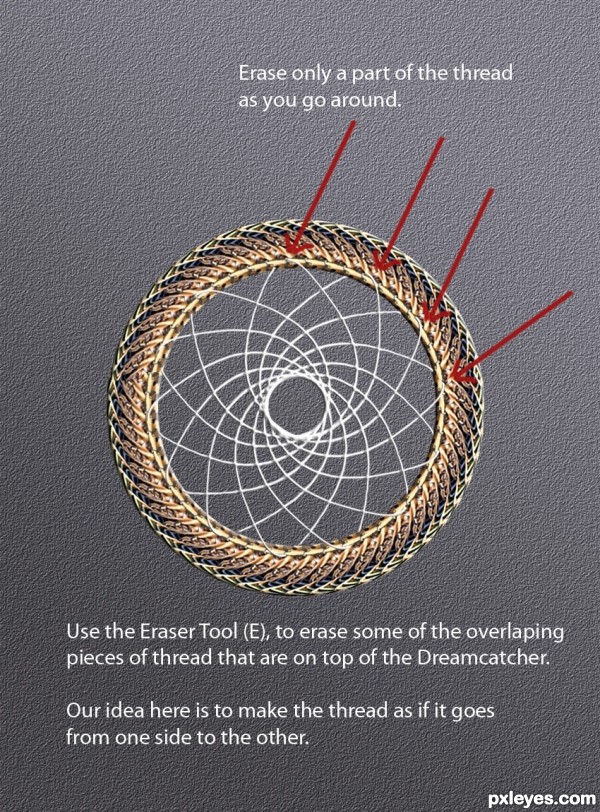
Use the Eraser Tool (E) , to erase some parts of the thread that are overlaping the edge of the circle. As shown in image.
Our idea is to make the thread as if it goes from one side to the other of the Dreamcatcher.
Step 34
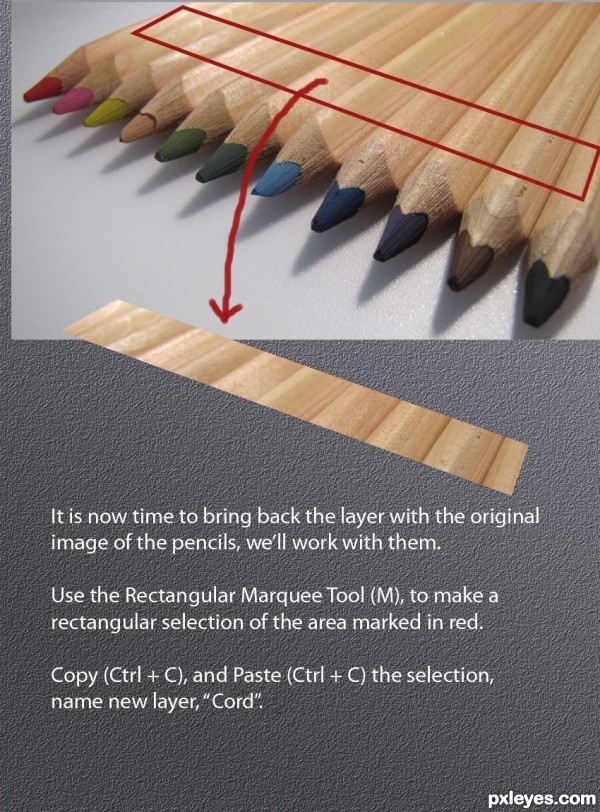
Do you remember to keep a copy of layer "Pencils". Now it time to bring them back.
Use the Rectangular Marquee Tool (M), to make a rectangular selection of the area shown in red in the image.
Copy (Ctrl + C) and Paste (Ctrl + V) the selection. Name this layer, "Cord".
Step 35
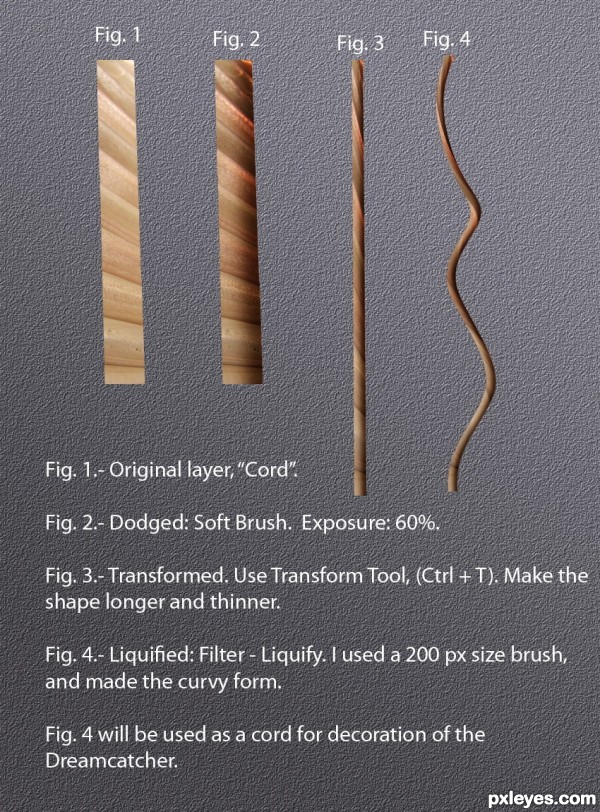
In this image I am showing you the process and steps to transform the rectangular selection from the pencils, into a cord or string, that will hold the feathers and some beads, as ornaments for the Dreamcatcher. I made the cord / string a little wavy, but you can make a little straight. Most of the cord / string, will be hidden below the ornaments anyway. This is just the base.
Fig 1. Original layer, "Cord".
Fig 2. Dodged on the left side and burned on the right. Soft brush, exposure 60%.
Fig 3. Use the Transform Tool (Ctrl + T), to make the shape longer and thinner.
Fig. 4. Use Filter - Liquify - Warp, to warp or liquify the shape into something wavy or a little curvy. I used a 200 px size brush.
This Fig. 4, will be used as a cord or string for decoration of the Dreamcatcher.
Step 36
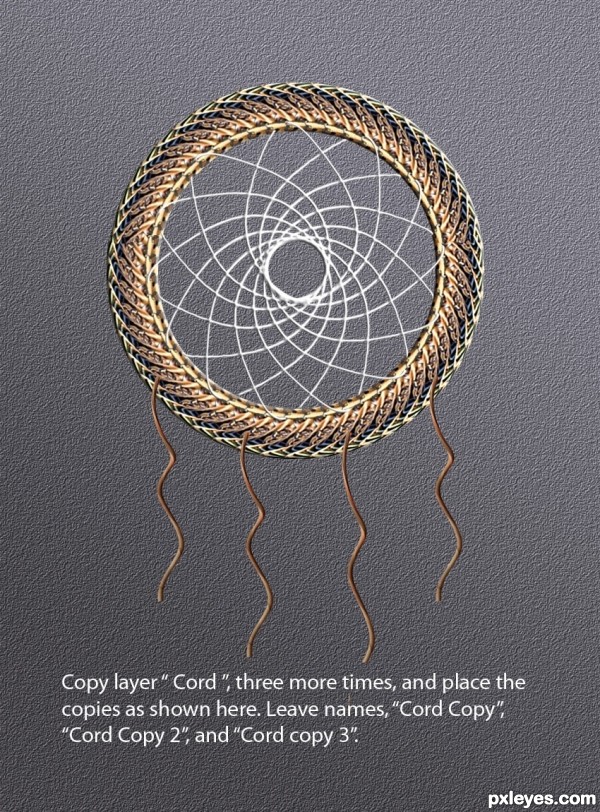
Copy layer, "Cord" three more times.
Place layers on top of layer, "Dreamcatcher". You can put them BEHIND this layer, as you will see later in the image, the cords are shown behind.
Leave the names as they will appear. Cord copy, Cord copy 2, Cord copy 3.
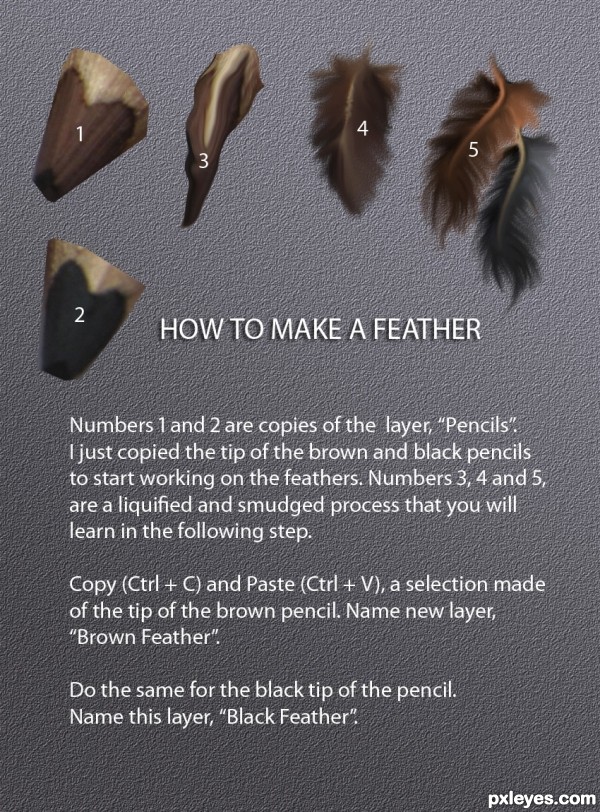
Step 37
HOW TO MAKE A FEATHER.
In this step I will show you how to make a feather using the colored tip of a pencil.
Numbers 1 and 2 are copies of layer, "Pencils" . I used the tip of the brown and black pencils to start working in the making of a feather. We'll make a brown feather.
Numbers 3, 4, and 5, are the process of liquifying, warping, smudging, the tip of the pencil to get the form of a fluffy feather. You'll learn this process in the following step.
Copy (Ctrl + C) and Paste (Ctrl + V), a selection made of the tip of the brown pencil. Name this layer, "Brown Feather".
Do the same with the tip of the black pencil. Name this layer, "Black Feather".
Step 38
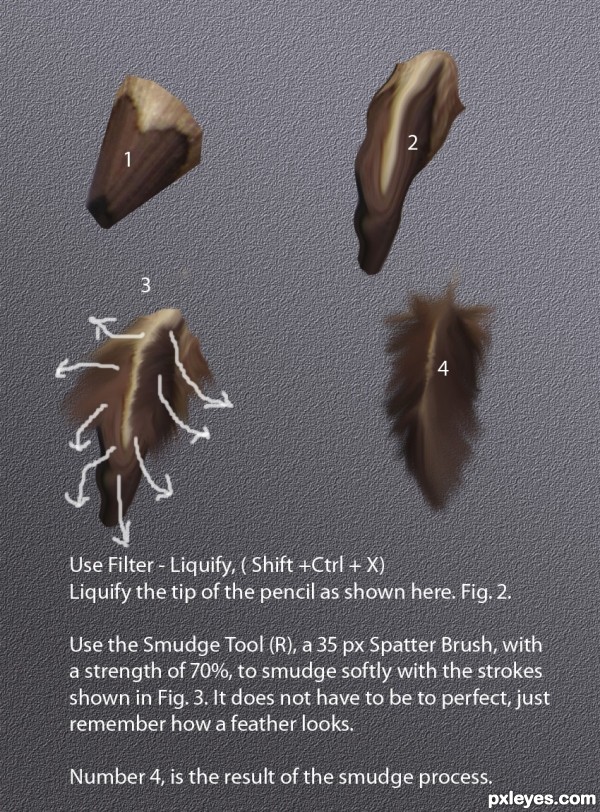
Here is the way I made the brown feather.
Number 1, shows layer, "Brown Feather".
Number 2, Use Filter - Liquify - Warp, to warp or liquify the tip of the pencil.
Number 3, Use the Smudge Tool ( R ), and a Spatter Brush, 35 px, with strength of 70%. (Here, you can diminish the strength, it depends how your strokes are made, if they are not kind of fluffy, go down to 55 or even 60%).
Number 4, shows the recult of the smudging process.
Step 39
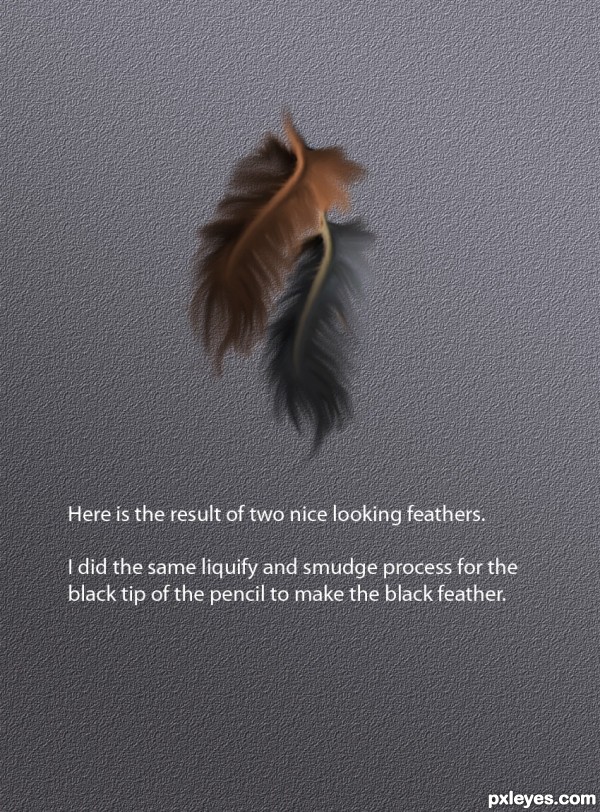
Here is the result of making two nice looking fluffy feathers.
Do the same process with the tip of the black pencil to make the black feather.
Step 40
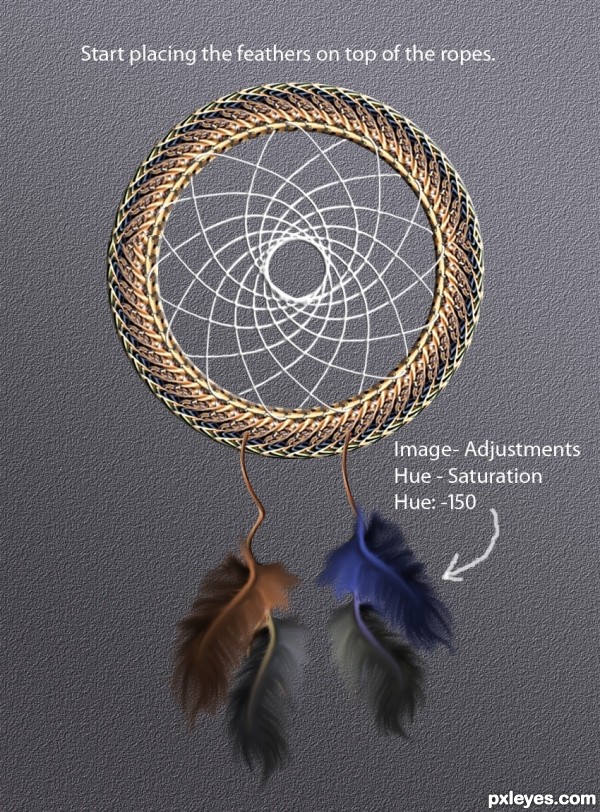
Start placing the feathers on the Dreamcatcher.
Merge down layers, "Brown and Black" feathers to form a single layer, name it, "Feathers".
Make another copy of layer, "Feathers" name this layer, "Feathers 2".
Add a Hue / Saturation to the brown feather to make it blue.
Hue: - 150.
Step 41
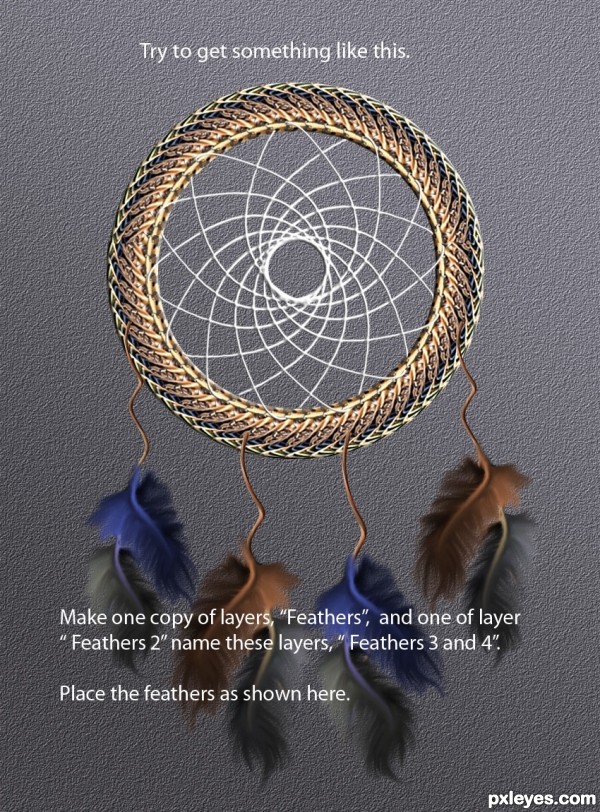
Make a copy of layer, " Feathers " and other copy of layer, "Feathers 2".
Name new layers, "Feathers 3 and " Feathers 4 ".
Place the feathers as shown in image.
Step 42
ADDING SOME BEADS TO THE DREAMCATCHER.
Beads are colorful ornaments that go well with the design of a dreamcatcher. We will use the colored tip of the pencils again.
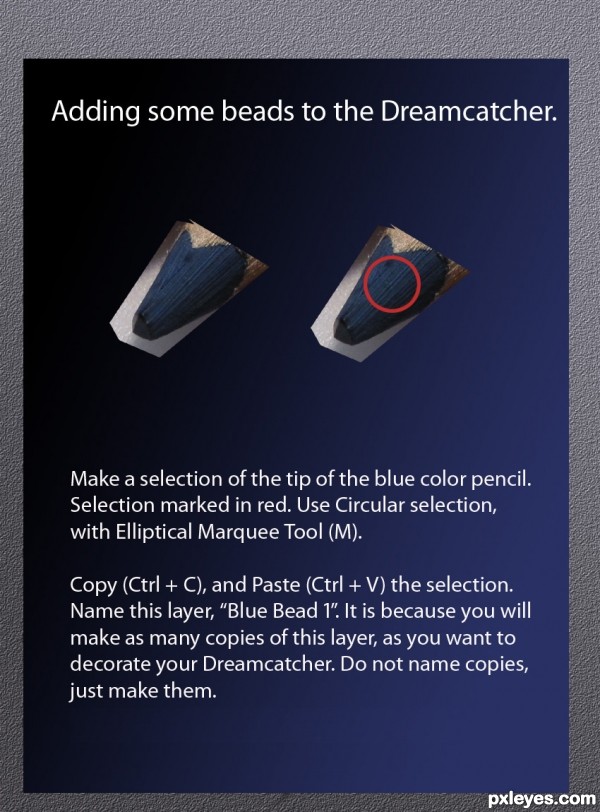
Use the Elliptical Marquee Tool (M), to make a circular selection of the tip of the blue pencil.
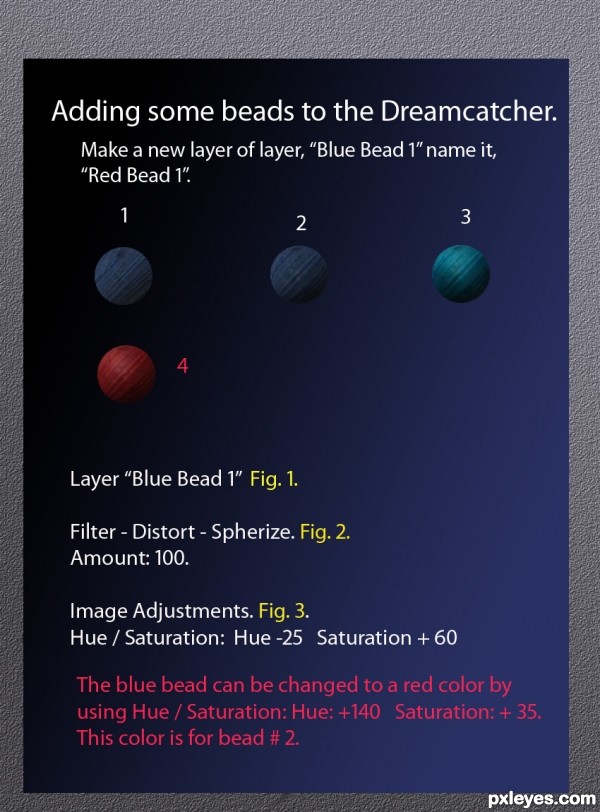
Copy (Ctrl + C) and Paste (Ctrl + V) the selection. Name this layer, "Blue Bead1" . You are giving this name to this layer, as you will make more copies of it. You can make as many copies you want to decorate your Dreamcatcher, but do not make it to busy. You want it to look nice and colorful.
Step 43
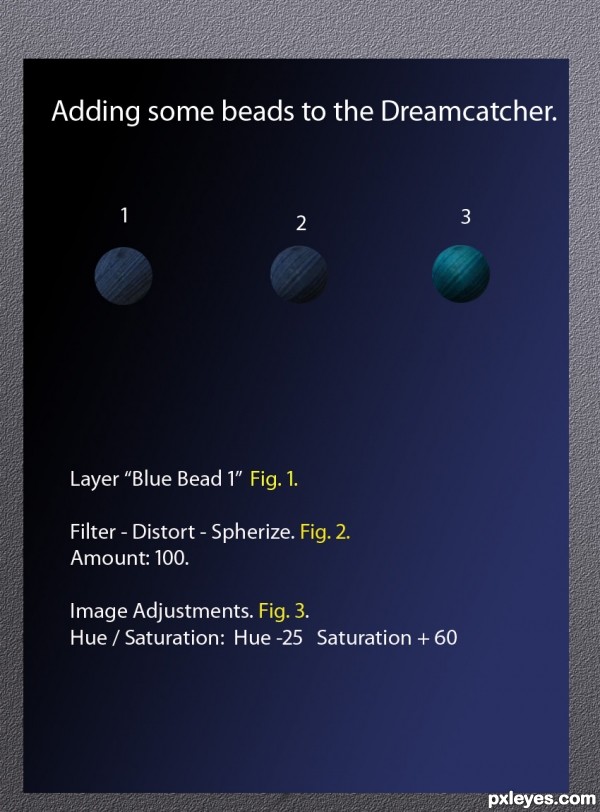
Figure 1.- Layer "Blue Bead".
Figure 2.- Filter - Distort - Spherize. Amount 100.
Figure 3.- Image - Adjustments - Hue / Saturation.
Hue: -25.
Saturation + 60.
Step 44
Make a copy of layer, "Blue Bead1", name new layer, "Red Bead 1".
Here in the text in red, tells you that you can change the color of the blue bead from blue to red. This is for Figure # 2.
Image - Adjustments - Hue / Saturation.
Hue: + 140.
Saturation: + 35.
When the beads are blue and red, you can dodge and burn the edges just a little to give them a highlight and a shadow.
Step 45
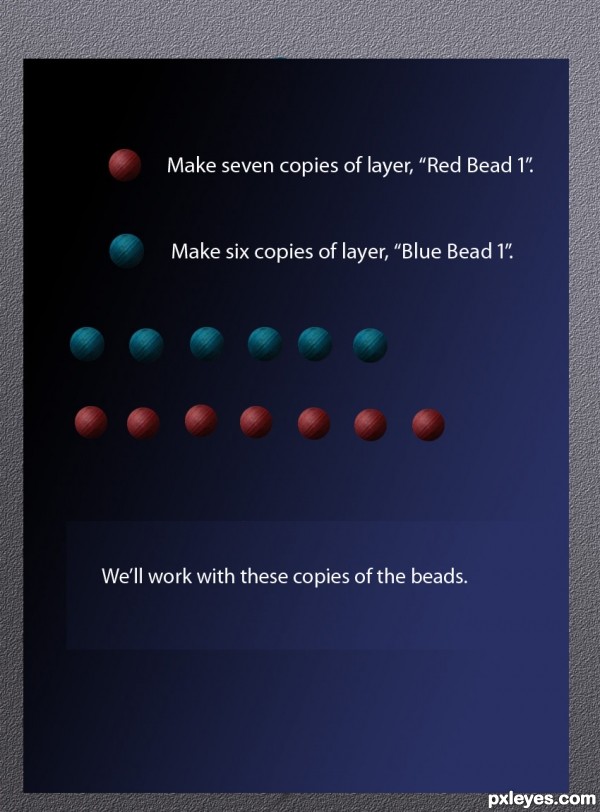
Make seven copies of layer, "Red Bead 1", and six copies of layer, "Blue Bead 1".
We'll start working with these copies.
Step 46
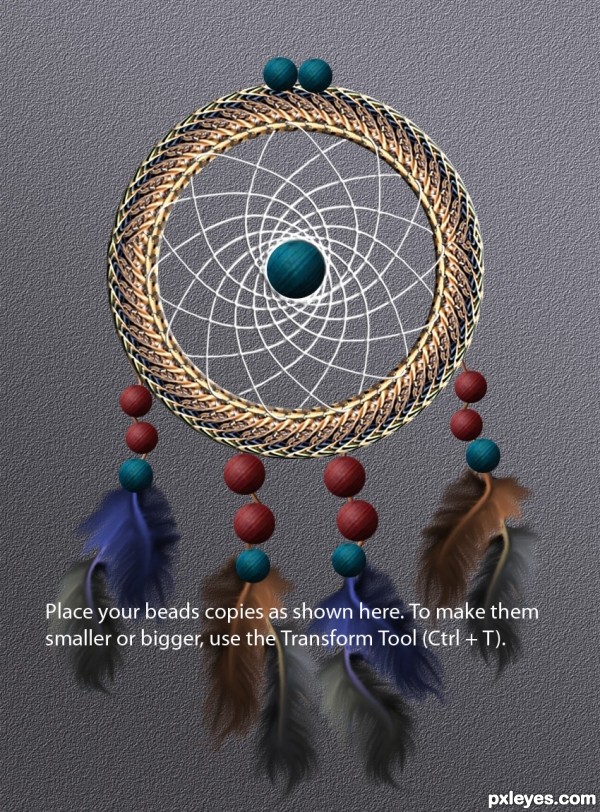
Place your red and blue beads as shown in image. I changed the two at the top of the Dreamcatcher, as you will see a little later, so, it is up to you if you want to leave them as they are placed. It is just an idea.
Use the Transform Tool (Ctrl + T), to make them bigger or smaller. I think smaller will look better. Do you notice that the rope / string is not showing much, it is because it is covered with the beads and feathers, and I also placed the rope or string behind layer "Dreamcatcher".
Step 47
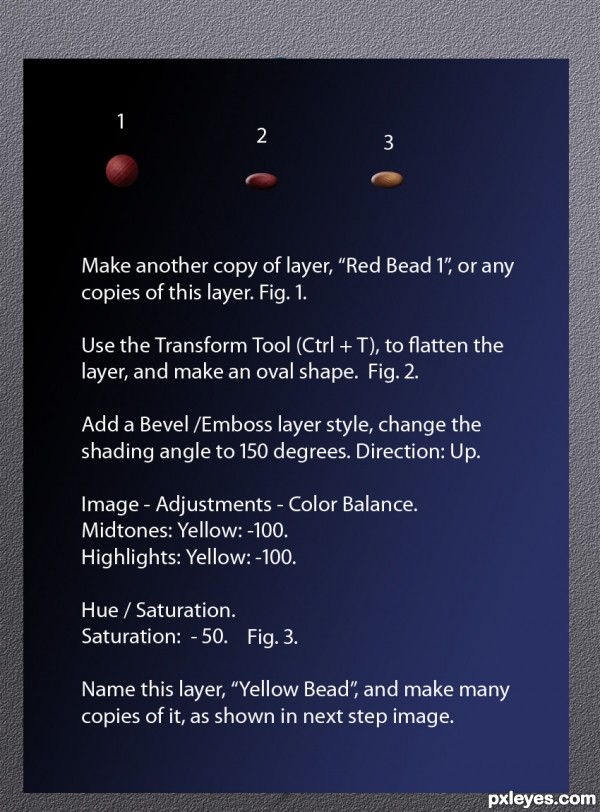
Make another copy of layer, "Red Bead 1", or any copy of this layer. Fig. 1.
Name this layer, "Yellow Bead", and make as many copies as shown in image.
Use the Transform Tool (Ctrl + T), to make the shape kind of oval or flattened. Fig. 2.
Add a Bevel / Emboss layer style. Change the shading to 150 degrees, direction up. Fig. 3.
Image - Adjustments - Color Balance.
Midtones: Yellow - 100.
Highlights: Yellow - 100.
Hue / Saturation: Saturation - 50.
Step 48
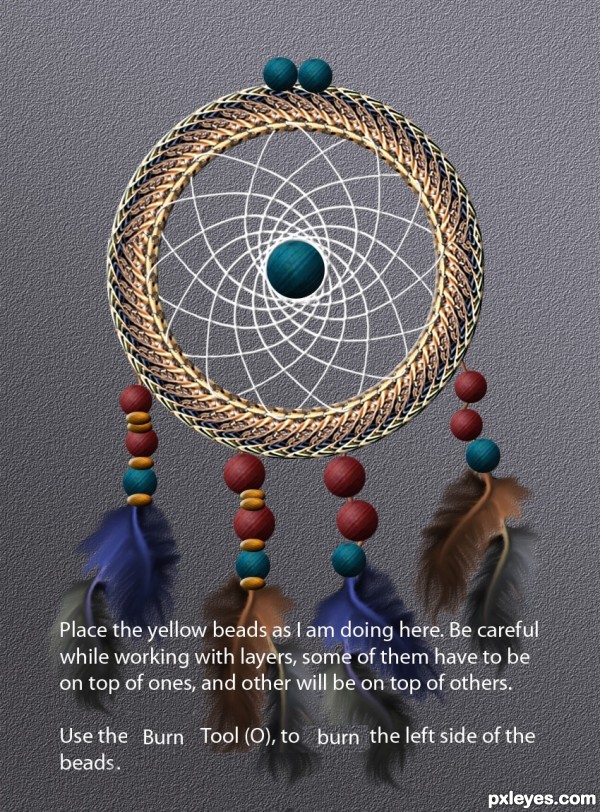
Place the yellow beads as shown in image. Be careful while working with layers, some times this can be confusing placing a layer over the other.
Use the BurnTool (O), to burn the left side of the beads.
Step 49
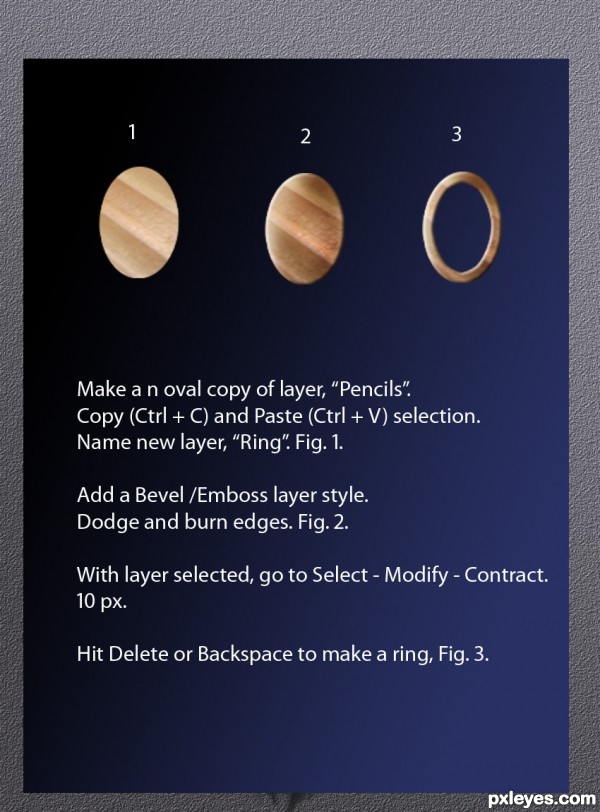
Make an oval copy of layer, "Pencils", as shown in image.
Use the Elliptical Marquee Tool (M). Copy (Ctrl + C) and Paste ( Ctrl + V ) the selection, name new layer, "Ring". Fig. 1.
Add a Bevel / Emboss layer style, leave settings as they are.
Dodge and burn the edges. Fig. 2.
With layer selected, go to Select - Modify - Contract. 10 px. Fig. 3.
Click delete or backspace to delete the center of the oval.
Step 50
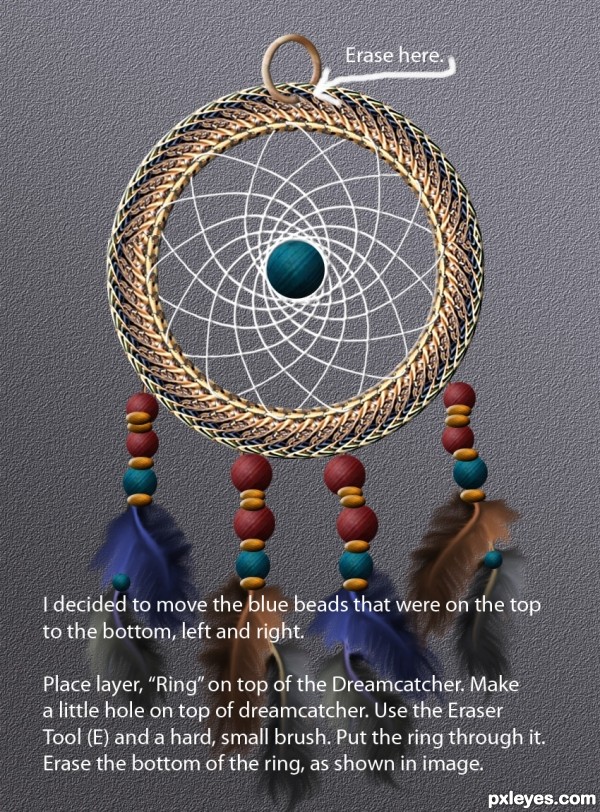
I decided to move the blue beads that were on top of the Dreamcatcher, and place them below over the feathers.
Place layer, "Ring", on top of layer, "Dreamcatcher".
Use the Eraser Tool (E), to make a small hole on top of the Dreamcatcher.
Using the Eraser Tool (E) again, erase part of the bottom of the ring, to put the ring through the Dreamcatcher as shown in image.Use a small hard brush to do it.
Step 51
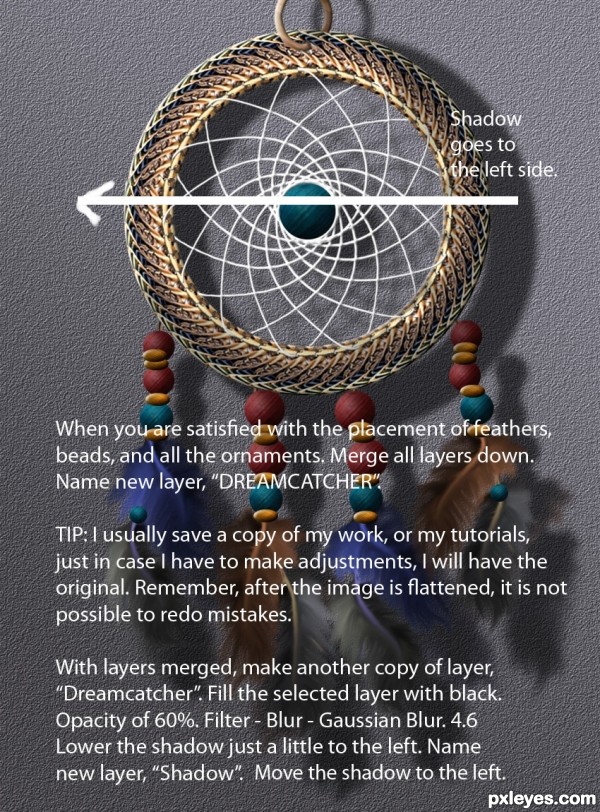
I think the making of the Dreamcatcher is getting close to an end. We will add a shadow to it, to make it look real nice. The shadow, will go to the left side of the Dreamcatcher, as the light is coming from the right side.
Merge all layers concerning your Dreamcatcher. Name new layer, "Dreamcatcher", because all layers will go down to this. BUT DO NOT FLATTEN THE IMAGE. Leave layer, "Background" as it is.
With all your layers merged down, make a copy of layer, "Dreamcatcher". Name new layer, "Shadow".
Fill the selected layer with black.
Opacity: 60%.
Filter - Blur - Gaussian Blur. 4.6.
Lower the shadow to the left, just a little.
Step 52
Here is our final image.
Step 53
I thank you for following me through the steps of this tutorial, as you have done before. I sure appreciate your patience, and you desire to learn something new. I do hope that all the tutorials written here in pxleyes, are helpful to you, in your learning, and in your ability to create new Art.
It is important to me, to know, if you have any questions regarding some steps done in this tutorial, or if you have trouble with the rotation tool, you can ask me, or any other member of this community of artists, and we will help you.
Thanks again, and good luck in your path through Art.

Hope you can learn something new from this tutorial.
I feel really glad if you give me feedback through comment below. Soon i am going to show more interesting & innovative tutorials so please keep visit our blog. That’s for now.
Have fun!
Feel free to contact with Clipping Design for clipping path service, image editing service, image masking service or any kind of design support.
Thank you…
Credit: pxleyes.com
No comments:
Post a Comment